前言
Swift 支持靜態庫打包已經有一段時間了,CocoaPods 也提供了 static_framework 參數。然而大部分的第三方依賴都沒有及時更新。
本文給出個相對方便一些的方案用上靜態庫,個人感覺在依賴不那么復雜的時候成本還是比較低的。
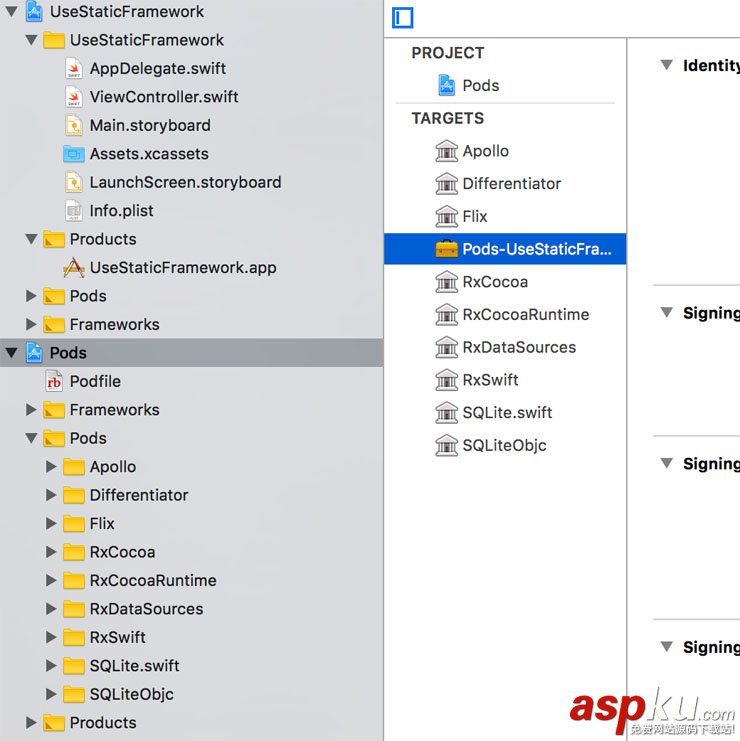
效果如下:

示例地址:UseStaticFramework
想辦法為每一個 pod 添加 static_framework 是關鍵。
直接修改 podspec 不太現實,因為 CocoaPods 并沒有提供相關的接口。但是當一個 pod 指定 podspec 地址時,這個 podspec 會被保存在本地。
如果 pod 沒有更新,pod install 將直接從本地獲取 pod 信息,這就為我們修改 pod 提供了可能。
target 'UseStaticFramework' do pod 'RxSwift', :git => 'https://github.com/ReactiveX/RxSwift.git'endpre_install do |installer| installer.sandbox.specifications_root.children.each do |podspec| if podspec.extname() == '.json' edit_pod_spec podspec end endenddef edit_pod_spec(file) code = File.read(file) json = JSON.parse(code) json['static_framework'] = true File.write(file, JSON.generate(json))end
在 Podfile 中添加以上代碼,執行兩次 bundle exec pod install 即可將依賴 RxSwift 變成靜態庫。相比單獨建一個 Specs 方便很多了,特別是在 RxSwift 有更新時,我們也無需增加成本,執行 bundle exec pod update 即可。
有些依賴稍微麻煩些,比如 RxCocoa 。就目前來看,Swift 靜態庫似乎還不能混編,好在 RxCocoa 支持 SPM,在 SPM 中有一個 RxCocoaRuntime 依賴。
創建一個 RxCocoaRuntime.podspec 使用,再調整一下 RxCocoa 的 podspec 即可,注意添加 SWIFT_PACKAGE 編譯標記:
pod 'RxCocoa', :git => 'https://github.com/ReactiveX/RxSwift.git'pod 'RxCocoaRuntime', :podspec => 'https://raw.githubusercontent.com/DianQK/UseStaticFramework/master/RxCocoaRuntime.podspec'def edit_pod_spec(file) code = File.read(file) json = JSON.parse(code) json['static_framework'] = true if json['name'] == 'RxCocoa' json['xcconfig'] = { :OTHER_SWIFT_FLAGS => '$(inherited) "-D" "SWIFT_PACKAGE"' } json['source_files'] = ['RxCocoa/RxCocoa.swift/285277.html">swift/161337.html">swift', 'RxCocoa/Common/**/*.{swift}', 'RxCocoa/Traits/**/*.{swift}', 'RxCocoa/Foundation/**/*.{swift}', 'RxCocoa/Runtime/**/*.{swift}', 'Platform/**/*.swift'] json['preserve_paths'] = ['RxCocoa/RxCocoa.h', 'RxCocoa/*.swift', 'RxCocoa/Common/**/*.{swift,h,m}', 'RxCocoa/Traits/**/*.{swift,h,m}', 'RxCocoa/Foundation/**/*.{swift,h,m}', 'RxCocoa/Runtime/**/*.{swift,h,m}', 'Platform/**/*.swift'] json['dependencies'] = { :RxSwift => '~> 4.1', :RxCocoaRuntime => '~> 4.1' } end File.write(file, JSON.generate(json))end 執行兩次 bundle exec pod install,完成。
Apollo 這種也能搞,稍微麻煩一些,有些代碼沒有引入 UIKit,最終導致按照上面的方案編譯不過去。
pod 'SQLite.swift', :git => 'https://github.com/stephencelis/SQLite.swift.git'pod 'SQLiteObjc', :podspec => 'https://raw.githubusercontent.com/DianQK/UseStaticFramework/master/SQLiteObjc.podspec'pod 'Apollo', :git => 'https://github.com/apollographql/apollo-ios.git'pod 'Apollo/SQLite', :git => 'https://github.com/apollographql/apollo-ios.git'# edit_pod_specif json['name'] == 'SQLite.swift' json['xcconfig'] = { :OTHER_SWIFT_FLAGS => '$(inherited) "-D" "SWIFT_PACKAGE"' } json['dependencies'] = { :SQLiteObjc => '~> 0.11.4' } json['subspecs'] = [{ :name => 'standard', :source_files => 'Sources/{SQLite,SQLiteObjc}/**/*.{swift}', :exclude_files => 'Sources/**/Cipher.swift', :library => 'sqlite3' }]endpost_install do |installer| %w(Pods/Apollo/Sources/ApolloSQLite/*.swift).flat_map { |x| Dir.glob(x) }.each do |file| code = File.read(file) unless code.include? "import UIKit" FileUtils.chmod("+w", file) File.write(file, "import UIKit/n" + code) end endend給這些沒添加 import UIKit 代碼補上就行了。
總結
以上就是這篇文章的全部內容了,希望本文的內容對大家的學習或者工作具有一定的參考學習價值,如果有疑問大家可以留言交流,謝謝大家對VEVB武林網的支持。
新聞熱點
疑難解答