本篇文章主要介紹了Android 利用三階貝塞爾曲線繪制運動軌跡的示例,分享給大家,具體如下:
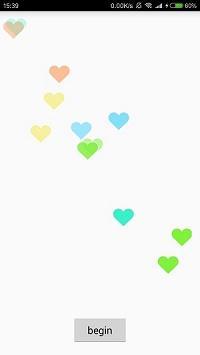
實現點贊效果,自定義起始點以及運動軌跡
效果圖:

xml布局:
<RelativeLayout xmlns:android="http://schemas.android.com/apk/res/android" xmlns:tools="http://schemas.android.com/tools" android:id="@+id/rl_root" android:layout_width="match_parent" android:layout_height="match_parent" tools:context="stone.wshh.com.touch.MainActivity"> <stone.wshh.com.touch.MyLoveLayout android:layout_marginBottom="100dp" android:layout_marginRight="15dp" android:id="@+id/love_layout" android:layout_width="match_parent" android:layout_height="match_parent"> </stone.wshh.com.touch.MyLoveLayout> <Button android:id="@+id/bt_bottom" android:text="begin" android:layout_alignParentBottom="true" android:layout_centerHorizontal="true" android:layout_marginBottom="20dp" android:layout_width="100dp" android:layout_height="50dp" /></RelativeLayout>
MainActivity類:
public class MainActivity extends Activity implements View.OnClickListener{ private Button btBottom;// private WaitNoticeDialog dialog;// public Handler handler; private MyLoveLayout love; @Override protected void onCreate(Bundle savedInstanceState) { super.onCreate(savedInstanceState); setContentView(R.layout.activity_main); btBottom = (Button) findViewById(R.id.bt_bottom); love = (MyLoveLayout) findViewById(R.id.love_layout); btBottom.setOnClickListener(this);// handler=new IHandler(this);// dialog = new WaitNoticeDialog(this); } static class IHandler extends Handler { private WeakReference<MainActivity> ui; IHandler(MainActivity ui) { this.ui = new WeakReference<MainActivity>(ui); } @Override public void handleMessage(Message msg) { if(ui!=null&&ui.get()!=null){ ui.get().handleMsg(msg); } } } /** * 線程消息處理 * @param msg */ public void handleMsg(Message msg){ switch (msg.what) { } } @Override public void onClick(View v) { switch (v.getId()){ case R.id.bt_bottom: love.addHeart(); break; } } @Override protected void onDestroy() { super.onDestroy();// handler.removeCallbacksAndMessages(null); }}自定義view:MyLoveLayout
public class MyLoveLayout extends RelativeLayout { private Drawable[] drawables; private Interpolator[] mInterpolators; private int dWidth, mWidth; private int dHeight, mHeight; private LayoutParams lp; private Random random = new Random(); public MyLoveLayout(Context context, AttributeSet attrs) { super(context, attrs); //imageView位置是相對于MyLoveLayout init(); } @Override protected void onMeasure(int widthMeasureSpec, int heightMeasureSpec) { super.onMeasure(widthMeasureSpec, heightMeasureSpec); //得到本布局的寬高 mWidth = getMeasuredWidth(); mHeight = getMeasuredHeight(); } private void init() { // 初始化顯示的圖片 drawables = new Drawable[7]; drawables[0] = getResources().getDrawable(R.drawable.heart_1); drawables[1] = getResources().getDrawable(R.drawable.heart_2); drawables[2] = getResources().getDrawable(R.drawable.heart_3); drawables[3] = getResources().getDrawable(R.drawable.heart_4); drawables[4] = getResources().getDrawable(R.drawable.heart_5); drawables[5] = getResources().getDrawable(R.drawable.heart_6); drawables[6] = getResources().getDrawable(R.drawable.heart_7); // 初始化插補器 mInterpolators = new Interpolator[4]; mInterpolators[0] = new LinearInterpolator();// 線性 mInterpolators[1] = new AccelerateInterpolator();// 加速 mInterpolators[2] = new DecelerateInterpolator();// 減速 mInterpolators[3] = new AccelerateDecelerateInterpolator();// 先加速后減速 // 獲取圖片寬高// dWidth = drawables[0].getIntrinsicWidth();// dHeight = drawables[0].getIntrinsicHeight(); //手動設置寬高 dWidth = dip2px(getContext(), 40); dHeight = dip2px(getContext(), 40); lp = new LayoutParams(dWidth, dHeight); //設置view控件的起始位置// lp.addRule(CENTER_HORIZONTAL, TRUE);// 這里的TRUE 要注意 不是true lp.addRule(ALIGN_PARENT_RIGHT, TRUE); lp.addRule(ALIGN_PARENT_BOTTOM, TRUE); } /** * dp轉px值 */ private int dip2px(Context context, float dpValue) { float scale = context.getResources().getDisplayMetrics().density; return (int) (dpValue * scale + 0.5f); } /** * 進場動畫,三種同時播放 * alpha透明度 (80%-0%) * scaleX 寬度 target(20%-100%) * scaleY 高度 * @param target * @return */ private AnimatorSet getEnterAnimator(final View target) { ObjectAnimator alpha = ObjectAnimator.ofFloat(target, View.ALPHA, 0.2f, 1f); ObjectAnimator scaleX = ObjectAnimator.ofFloat(target, View.SCALE_X, 0.2f, 1f); ObjectAnimator scaleY = ObjectAnimator.ofFloat(target, View.SCALE_Y, 0.2f, 1f); AnimatorSet enter = new AnimatorSet(); enter.setTarget(target); enter.setInterpolator(new LinearInterpolator()); enter.setDuration(500).playTogether(alpha, scaleX, scaleY); return enter; } private ValueAnimator getBezierValueAnimator(final View target) { // 初始化貝塞爾估值器 //隨機產生兩個點,以確定一條3階貝塞爾曲線 BezierEvaluator evaluator = new BezierEvaluator(getPointF(2), getPointF(1)); // 起點在底部中心位置,終點在底部隨機一個位置,改變new PointF()中值來改變起始位置// ValueAnimator animator = ValueAnimator.ofObject(evaluator, new PointF((mWidth - dWidth) /// 2, mHeight - dHeight), new PointF(random.nextInt(getWidth()), 0)); // 起點在右下角位置,終點在左上角位置 ValueAnimator animator = ValueAnimator.ofObject(evaluator, new PointF(mWidth - dWidth, mHeight - dHeight), new PointF(0, 0)); animator.setTarget(target); animator.addUpdateListener(new ValueAnimator.AnimatorUpdateListener() { @Override public void onAnimationUpdate(ValueAnimator valueAnimator) { // 這里獲取到貝塞爾曲線計算出來的的x y值 賦值給view 這樣就能讓愛心隨著曲線走啦 PointF pointF = (PointF) valueAnimator.getAnimatedValue(); target.setX(pointF.x); target.setY(pointF.y); // alpha動畫,根據運動距離改變透明度// target.setAlpha(1 - valueAnimator.getAnimatedFraction()); target.setAlpha(1 - valueAnimator.getAnimatedFraction() + 0.3f); } }); animator.setDuration(3000); return animator; } private PointF getPointF(int i) { PointF pointF = new PointF(); //pointF.x,pointF.y都是隨機,因此可以產生n多種軌跡 pointF.x = random.nextInt(mWidth);//0~loveLayout.Width //為了美觀,建議盡量保證P2在P1上面,那怎么做呢?? //只需要將該布局的高度分為上下兩部分,讓p1只能在下面部分范圍內變化(1/2height~height),讓p2只能在上面部分范圍內變化(0~1/2height),因為坐標系是倒著的; //0~loveLayout.Height/2 if (i == 1) { pointF.y = random.nextInt(mHeight / 2) + mHeight / 2;//P1點Y軸坐標變化 } else if (i == 2) {//P2點Y軸坐標變化 pointF.y = random.nextInt(mHeight / 2); }// 寫死的一條軌跡// if (i == 1) {// pointF.x=mWidth-dWidth*2;// pointF.y = 3*dHeight;// } else if (i == 2) {// pointF.x=dWidth*2;// pointF.y = mHeight -dHeight;// } return pointF; } public void addHeart() { final ImageView imageView = new ImageView(getContext()); // 隨機選一個愛心 imageView.setImageDrawable(drawables[random.nextInt(6)]); imageView.setLayoutParams(lp); addView(imageView); AnimatorSet finalSet = new AnimatorSet(); AnimatorSet enterAnimatorSet = getEnterAnimator(imageView);//入場動畫 ValueAnimator bezierValueAnimator = getBezierValueAnimator(imageView);//貝塞爾曲線路徑動畫 finalSet.playSequentially(enterAnimatorSet, bezierValueAnimator);// finalSet.playSequentially(bezierValueAnimator); finalSet.setInterpolator(mInterpolators[random.nextInt(4)]); finalSet.setTarget(imageView); finalSet.addListener(new AnimatorListenerAdapter() { @Override public void onAnimationEnd(Animator animation) { super.onAnimationEnd(animation); removeView((imageView));//刪除愛心 } }); finalSet.start(); }}貝塞爾估值器:BezierEvaluator
public class BezierEvaluator implements TypeEvaluator<PointF> { private PointF mControlP1; private PointF mControlP2; public BezierEvaluator(PointF controlP1, PointF controlP2) { this.mControlP1 = controlP1; this.mControlP2 = controlP2; } @Override public PointF evaluate(float time, PointF start, PointF end) { float timeLeft = 1.0f - time; PointF point = new PointF(); point.x = timeLeft * timeLeft * timeLeft * (start.x) + 3 * timeLeft * timeLeft * time * (mControlP1.x) + 3 * timeLeft * time * time * (mControlP2.x) + time * time * time * (end.x); point.y = timeLeft * timeLeft * timeLeft * (start.y) + 3 * timeLeft * timeLeft * time * (mControlP1.y) + 3 * timeLeft * time * time * (mControlP2.y) + time * time * time * (end.y); return point; }}以上就是本文的全部內容,希望對大家的學習有所幫助,也希望大家多多支持VEVB武林網。
新聞熱點
疑難解答