国产探花免费观看_亚洲丰满少妇自慰呻吟_97日韩有码在线_资源在线日韩欧美_一区二区精品毛片,辰东完美世界有声小说,欢乐颂第一季,yy玄幻小说排行榜完本

首頁 > 數據庫 > Oracle > 正文

Install Oracle 9i/10g On RHEL AS 3

2024-08-29 13:29:13
字體:
來源:轉載
供稿:網友

商業源碼熱門下載www.html.org.cn


install oracle 9i/10g on rhel as 3 

作者:ern ([email protected])

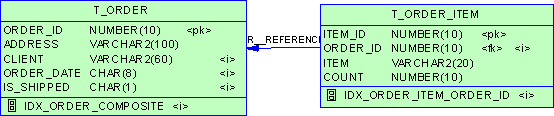
本文描述了在red hat enterprise linux advanced server 3 (rhel as 3)上安裝oracle 9i/10g 必要的步驟和相關知識。相關文章很多,本文主要著重于整理和總結了網友(特別是fenng)的文檔、red hat公司的rhel相關白皮書、oracle公司的技術文檔和白皮書等,比較兩個版本在as 3上的共同點和不同點,盡可能給出完整的安裝說明。os的安裝將不再贅述。總體論述以10g的流程為主,但是方框中將插入9i的不同點。

硬件要求:

檢查內容最小值檢查命令參考物理內存512m# grep memtotal /proc/meminfo 交換空間1.0 gb或2倍內存# grep swaptotal /proc/meminfo /tmp 空間400 mb # df -k /tmp 軟件所需空間2.5 gb # df -k  數據庫文件1.2 gb # df -k 


軟件要求與配置


操作系統版本:red hat enterprise linux as release 3 (taroon) update 3
對于9i,需要內核2.4.21-4el(一般as 3均已滿足),對于10g需要內核2.4.21-15el。

確認以下 rpm包都已經安裝:

make-3.79.1gcc-3.2.3-34glibc-2.3.2-95.20
compat-db-4.0.14.5
compat-gcc-7.3-2.96.128
compat-gcc-c++-7.3-2.96.128
compat-libstdc++-7.3-2.96.128
compat-libstdc++-devel-7.3-2.96.128openmotif21-2.1.30-8setarch-1.3-1
可以通過以下指令察看本機當前的rpm包情況   rpm -qa | grep compat 
  rpm -qa | grep openmotif 
  rpm -qa | grep setarch  gcc -v
  rpm -q glibc
如果個別包沒有安裝,請在系統安裝光盤中找到具體的軟件包(大多數在第三張光盤上),然后利用如下的命令來安裝相應的包:

  rpm -ivh compat.....rpm

注意:這些軟件包之間是有依賴性的,先后的順序要找好,否則會報告不能安裝的錯誤。

以上對硬件和軟件的檢查是針對10g,一般as 3 u3均可達到,9i的要求會更寬松,但在9i中請注意:

gcc應使用2.96版本,因此在安裝前執行:

  mv /usr/bin/gcc /usr/bin/gcc323
  ln -s /usr/bin/gcc296 /usr/bin/gcc
  mv /usr/bin/g++ /usr/bin/g++323
  ln -s /usr/bin/g++296 /usr/bin/g++

安裝完成后:

  rm /usr/bin/gcc
  mv /usr/bin/gcc32 /usr/bin/gcc

設定核心參數

  vi /etc/sysctl.conf

在該文件末尾加入如下內容:


#----------------------------------------
# parameters for oracle10g
kernel.shmall = 2097152
kernel.shmmax = 2147483648
kernel.shmmni = 4096
kernel.sem = 250 32000 100 128
fs.file-max = 65536
net.ipv4.ip_local_port_range = 1024 65000
#----------------------------------------


編輯完之后,保存,執行 /sbin/sysctl -p 命令使變更生效。

注意:上面kernel.shmmax/kernel.sem等是典型的核心參數配置,可能需要根據實際環境進行適當的變動。可參考以下表格獲取當前設定值,若設定值較上例大,則保留設定值,而kernel.shmmax應設為系統內存的一半,該值即指定了內核允許的最大共享內存段(segment)的大小,一般安裝oracle后,oracle將為sga申請一個段。若系統內存超過8g時安裝出錯,請參考附錄大內存的處理。
參數命令semmsl,semmns,semom & semmni/sbin/sysctl -a | grep semshmall,shmmax & shmmni/sbin/sysctl -a | grep shmfile-max/sbin/sysctl -a | grep file-maxip_local_port_range/sbin/sysctl -a | grep ip_local_port_range 
9i中,還應當在文件末尾增加:# disables packet forwarding
net.ipv4.ip_forward = 0
# enables source route verification
net.ipv4.conf.default.rp_filter = 1
# disables the magic-sysrq key
kernel.sysrq = 0

創建用戶和相關的組

  /usr/sbin/groupadd dba
  /usr/sbin/groupadd oper
  /usr/sbin/groupadd oinstall
  /usr/sbin/useradd -g oinstall -g dba,oper oracle
  /usr/sbin/passwd oracle

設定shell限制

出于性能上的考慮,還需要增大oracle用戶的限制,即增加nofile(可打開的文件描述符的最大數)和nproc(單個用戶可用的最大進程數量)。

  vi /etc/security/limits.conf 
添加如下的行:

oracle soft nproc 2047oracle hard nproc 16384oracle soft nofile 1024oracle hard nofile 65536
添加如下的行到/etc/pam.d/login 文件:
session required /lib/security/pam_limits.so


編輯 /etc/profile 文件,添加如下部分:
if [ $user = "oracle" ]; then if [ $shell = "/bin/ksh" ]; then ulimit -p 16384 ulimit -n 65536 else ulimit -u 16384 -n 65536 fi fi
之后,執行$ unlimit 驗證一下.

檢查并調整環境變量

登錄為oracle用戶 
  su – oracle 
  cd 
  vi .bash_profile

添加如下參數,具體值和現實環境有關。

export oracle_base=/u/app/oracle
export oracle_home=$oracle_base/product/10.1.0/db_1
export oracle_sid=test
export path=$path:$home/bin:$oracle_home/bin
export ld_library_path=$oracle_home/lib:/usr/lib
export lc_ctype=en_us.utf-8

然后執行 
  source .bash_profile
使環境變量生效。/u/app/oracle等相關目錄應該建立好并做合適的授權。


開始安裝

mount安裝盤,一般網上下載是壓縮文件,執行

cp /mnt/cdrom/ship.db.cpio.gz /u/install

gunzip ship.db.cpio.gz
cpio -idmv < ship.db.cpio
sh /u/install/disk1/uninstaller

如果不能出現安裝畫面,查看本文后面的faq。

10g的安裝相比以前的多了一個 checking operating system certification 的步驟。安裝文件會自動檢測所需的條件。如果有不符合的地方,安裝程序會報告給你,并會給出具體原因,大大減少了出錯的可能。
下面是檢查成功輸出的內容:

checking operating system certification
expected result: one of redhat-2.1,redhat-3,unitedlinux-1.0
actual result: redhat-3
check complete. the overall result of this check is: passed
=======================================================================

checking kernel parameters
checking for version=2.4.9.25; found version=2.4.21. passed
checking for shmall=2097152; found shmall=2097152. passed
checking for shmseg=10; found shmseg=4096. passed
checking for semmsl=250; found semmsl=250. passed
checking for semmni=128; found semmni=128. passed
checking for filemax=65536; found filemax=65536. passed
checking for shmmni=4096; found shmmni=4096. passed
checking for semmns=32000; found semmns=32000. passed
checking for semopm=100; found semopm=100.passed
checking for shmmin=1; found shmmin=1. passed
checking for shmmax=2147483648; found shmmax=2147483648. passed
check complete. the overall result of this check is: passed
=======================================================================

checking recommended operating system packages
checking for make-3.79; found make-3.79.1-17. passed
checking for binutils-2.11.90.0.8-12; found binutils-2.14.90.0.4-26. passed
checking for gcc-2.96; found gcc-3.2.3-20. passed
checking for openmotif-2.1.30-11; found openmotif-2.2.2-16. passed
check complete. the overall result of this check is: passed
=======================================================================

checking recommended glibc version
expected result: 2.2.4.31.7
actual result: 2.3.2.95.3
check complete. the overall result of this check is: passed
=======================================================================

validating oracle_base location (if set)
check complete. the overall result of this check is: passed
=======================================================================

其他的步驟比較清晰,不再贅述。

最后系統會提示你運行root.sh文件,按照提示做即可。
9i的安裝過程與10g基本一致,除缺少檢查os要求的步驟外,還要注意處理以下錯誤。1. 啟動oui時libcwait.so錯誤  用oracle用戶登錄,并在其家目錄下建立文件libcwait.c如下  /*
  gcc -o2 -shared -o $home/libcwait.so -fpic
  $home/libcwait.c
  */
  #include
  #include
  #include
  #include
  pid_t
  __libc_wait (int *status)
  {
  int res;  asm volatile ("pushl %%ebx/n/t"
    "movl %2, %%ebx/n/t"
    "movl %1, %%eax/n/t"
    "int $0x80/n/t"
    "popl %%ebx"
    : "=a" (res)
    : "i" (__nr_wait4), "0" (wait_any), "c" (status), "d" (0), "s"
    (0));
  return res;
  }  使用gcc -02 -shared -o $home/libcwait.so -fpic $home/libwait.c編譯。設置相關環境變量:  export ld_assume_kernel=2.4.19
  export ld_preload=$home/libcwait.so  另一個解決方案是到metalink.oracle.com下載p3006854_9204_linux.zip。2. 安裝時鏈接錯誤  第一個與$oracle_home/network/lib/ins_oemagent.mk有關,只需將該文件如下行注釋即可:  # ldflags = $(stdmode) -l$(libhome) -l$(oracle_home)/rdbms/lib -l $(oracle_home)/network/lib  隨后即可點擊“重試”繼續安裝。  第二個錯誤為$oracle_home/ctx/lib/ins_ctx.mk because / usr/bin/ld: ctxhx: hidden symbol `stat' in /usr/lib/libc_nonshared.a(stat.os),可以直接忽略。  以上鏈接錯誤也可通過在oracle metalink網站下載binutils-2.11.90.8.8-13.i386.rpm解決,但建議在用該包替換并完成數據庫安裝后替換回原rhel的版本。
附錄:

a. faq

1. 不能啟動安裝界面

運行runinstaller提示信息類似如下:

xlib:connection to "localhost:0.0" refused by server
xlib:client is not authorized to connect to server

exception in thread "main" java.lang.internalerror:can't connect to x11 window server using "localhost:0.0"
at .......

解決辦法:設定你的display環境參數。

  export display= your_ipaddress :0.0

或者用root簡單的執行一下# xhost + (要注意這樣會有安全上的隱患) 。


2.安裝界面顯示很多"口口"樣子的亂碼

解決辦法:查看locale輸出
# locale
lang=en_us.utf-8
lc_ctype=zh_cn.gb18030
lc_numeric="en_us.utf-8"
lc_time="en_us.utf-8"
lc_collate="en_us.utf-8"
lc_monetary="en_us.utf-8"
lc_messages="en_us.utf-8"
lc_paper="en_us.utf-8"
lc_name="en_us.utf-8"
lc_address="en_us.utf-8"
lc_telephone="en_us.utf-8"
lc_measurement="en_us.utf-8"
lc_identification="en_us.utf-8"
lc_all=


執行#export lc_ctype=en_us.utf-8 然后重新調用安裝程序.


3. 用ie登錄linux服務器上的em出現亂碼

 在linux(unix) 環境下成功安裝了oracle 10g,從windows下用ie瀏覽器登錄 10g 的em, 按鈕是"口口"這樣的方框.

解決辦法: 參考 http://www.dbanotes.net/oracle/oracle-10g-font.properties.htm 或者是參考這個 http://www.linuxsir.org/bbs/showthread.php?s=&threadid=98591 后者比較徹底,前者比較"quick & dirty ".


4.創建數據庫的時候出現ora-03113的錯誤

解決辦法: 查看核心參數是否調整正確.參考http://www.dbanotes.net/oracle/ora-03113.htm


5. redhat 9 / fc1等系統10g不支持如何安裝?

解決辦法:在10g不支持的linux發行版上安裝10g的解決方法

1) 運行runinstaller -ignoresysprereqs,這樣會跳過檢查

2) 摘自 www.puschitz.com 修改/etc/redhat-release文件:

#su - root
#cp /etc/redhat-release /etc/redhat-release.backup
#cat > /etc/redhat-release << eof
red hat enterprise linux as release 3 (taroon)
eof

安裝完畢,執行如下操作:
#su - root
#cp /etc/redhat-release.backup /etc/redhat-release

3). http://www.dbanotes.net/oracle/10g-beta-install-bug.htm

同樣的思路,我們可以修改oracle 的install/oraparam.ini文件達到目的


6 如何關掉那些 ocssd.bin 進程?

解決辦法:編輯/etc/inittab文件(做好備份)

注釋掉這一行:

h1:3:respawn:/etc/init.d/init.cssd run >/dev/null 2>&1 </dev/null

b. 大內存的配置

首先說明,以下材料來自install oracle on rhel as 2.1的白皮書,可能as 3對大內存的支持已經很好了,但是筆者此文主要來自查閱和編輯多篇文檔,具體的安裝限于硬件也沒能測試。所以,如果在as 3上出現了錯誤,不妨參考下文。

shmmax最大值為4gb-1。為了創建大于1.7gb的sga,必須使用共享內存文件系統(shmfs)。指令如下,并可添加到/etc/rc.local中,也可以使用/etc/fstab來創建shmfs,在增加/dev/shm前先注釋掉已有的/dev/shm條目。

  mount -t shm shmfs -o size=32g /dev/shm


  mount -t shm shmfs -o nr_blocks=8388608 /dev/shm

在8gb系統上使用shmfs,sga可以最大調整到7gb。需要調整init.ora,增加:

  use_indirect_data_buffers=true

另一種使用大sga的方法是使用lower mapped base,可以從1.7gb增長到2.7gb。具體方法可參考oracle白皮書。

c.大頁面的配置

as支持4mb的大頁面(而不是一般的4kb),這樣可以減少頁表中的條目,將sga鎖定在內存中,多用于大sga或多用戶時。這一特性存在于enterprise kernel中。

大頁面的數量可用cat /proc/meminfo查看。

配置步驟如下:

1. 在/etc/rc.local中

  echo 2 > /proc/sys/kernel/shm-use-bigpages (shmfs中使用大頁面)

  echo 1 > /proc/sys/kernel/shm-use-bigpages (sysv中使用大頁面)

  echo 0 > /proc/sys/kernel/shm-use-bigpages (不使用大頁面)

2. 在/etc/lilo.conf的boot段中增加如下參數,重新配置lilo并重啟系統

  append="bigpages=xxxxmb"

  對4gb的sga,可以設為4100mb;對2gb的,可以設為2100mb。

在8gb的機器上sga最大為5.4gb。


參考信息


installing oracle 10g on rhel as 3 step-by-step by fenng
http://www.dbanotes.net/oracle/install-oracle10g-rhel3.htm

tips & techniques - install & configure oracle9i & rhel as

deploying oracle9i database on red hat enterprise linux v.3

以上兩篇可在http://www.redhat.com/solutions/info/whitepapers/#rhel找到

oracle database quick installation guide 10 g release 1 (10.1) for linux x86
http://download-west.oracle.com/docs/html/b10813_01/toc.htm

oracle database installation guide 10 g release 1 (10.1) for unix systems
http://download-west.oracle.com/docs/html/b10811_02/toc.htm


發表評論 共有條評論
用戶名: 密碼:
驗證碼: 匿名發表
主站蜘蛛池模板: 耒阳市| 图片| 庆安县| 精河县| 富阳市| 图片| 叙永县| 花垣县| 德州市| 哈巴河县| 常德市| 仙居县| 星子县| 柯坪县| 锡林浩特市| 保山市| 庆阳市| 镇原县| 新泰市| 宁远县| 和龙市| 北川| 张家港市| 辉南县| 隆安县| 正镶白旗| 湘潭市| 荔波县| 深泽县| 梅河口市| 花垣县| 泸西县| 汝州市| 罗平县| 大英县| 大足县| 镇江市| 都兰县| 玉环县| 景德镇市| 沛县|