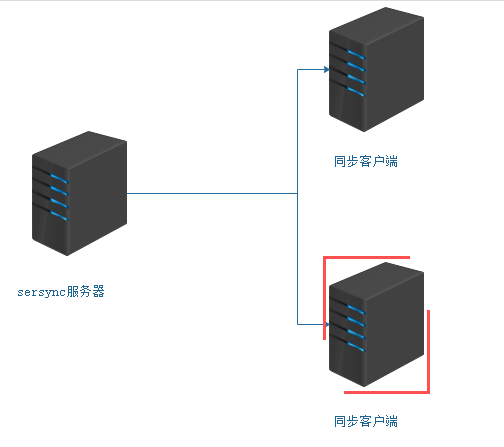
sersync其實是利用inotify和rsync兩種軟件技術來實現數據實時同步功能的,inotify是用于監聽sersync所在服務器上的文件變化,結合rsync軟件來進行數據同步,將數據實時同步給客戶端服務器。
工作過程:在同步主服務器上開啟sersync,負責監聽文件系統的變化,然后調用rsync命令把更新的文件同步到目標服務器上,主服務器上安裝sersync軟件,目標服務器上安裝rsync服務。
1、客戶端配置
[root@localhost2 ~]# cat /etc/rsyncd.conf ##created by cai at 2018-2-24uid=rsyncgid=rsyncuse chroot = nomax connections = 200timeout = 300pid file = /var/run/rsyncd.pidlock file = /var/run/rsync.locklog file = /var/log/rsyncd.log[data]path = /data/ignore errorsread only = falselist = falsehosts allow = 192.168.181.128:52000/24hosts deny = 0.0.0.0/32auth users = rsync_bodysecrets file = /etc/rsync.password[root@localhost2 ~]# ls -ld /data/drwxrwxrwx. 3 rsync rsync 4096 Feb 24 16:58 /data/[root@localhost2 ~]# cat /etc/rsync.password rsync_body:admin[root@localhost2 ~]# ls -ld /etc/rsync.password -rw-------. 1 root root 17 Feb 24 16:26 /etc/rsync.password #600權限[root@localhost2 ~]# netstat -lntup| grep "rsync"tcp 0 0 0.0.0.0:873 0.0.0.0:* LISTEN 1497/rsync tcp 0 0 :::873 :::* LISTEN 1497/rsync
2、主服務器配置
[root@localhost1 ~]# cat /etc/rsync.password admin[root@localhost1 ~]# ls -ld /etc/rsync.password -rw------- 1 root root 6 Feb 24 03:54 /etc/rsync.password
3、安裝sersync服務
采用inotify來對文件進行監控,當監控到文件有文件發生改變的時候,就會調用rsync實現觸發式實時同步!
安裝sersync(注意sersync是工作在rsync的源服務器上,也就是客戶端上)
[root@salt-client01 ~]# cd /usr/local/src/[root@salt-client01 src]# tar -zxvf sersync2.5.4_64bit_binary_stable_final.tar.gz -C /usr/local/GNU-Linux-x86/GNU-Linux-x86/sersync2GNU-Linux-x86/confxml.xml[root@salt-client01 src]# cd /usr/local/[root@salt-client01 local]# mv GNU-Linux-x86 sersync[root@salt-client01 local]# cd sersync/[root@salt-client01 sersync]# mkdir conf bin log[root@salt-client01sersync]# mv confxml.xml conf[root@salt-client01sersync]# mv sersync2 bin/sersync
修改配置文件
***********************************30行開始****************************** <commonParams params="-artuz"/> #-artuz為rsync同步時的參數 <authstart="true" users="rsync的虛擬用戶名(rsync_backup)" passwordfile="rsync的密碼文件"/> <userDefinedPort start="true"port="873"/><!-- port=874 --> <timeout start="false" time="100"/><!--timeout=100 --> <sshstart="false"/> ************************************第36行*********************************** <failLogpath="自己定義的log文件夾(/usr/local/sersync/log)rsync_fail_log.sh" timeToExecute="60"/><!--defaultevery 60mins execute once--> ******************************************************************************* *注:若有多個目錄備份可以穿件多個配置文件在啟動時的-o參數中添加即可[root@salt-client01 conf]# diff confxml.xml confxml.xml.bak24,25c24,25< <localpath watch="/data/"> #data就是本地需要同步的文件夾到服務器端的目錄< <remote ip="192.168.91.166" name="data"/> #data (server的模塊名)是rsync 服務端的文件夾,也就是推送到服務器端的目標文件夾,可以配置多個,---> <localpath watch="/opt/tongbu">> <remote ip="127.0.0.1" name="tongbu1"/>31c31< <auth start="true" users="rsync_body" passwordfile="/etc/rsync.password"/> #true 才能生效,rsync_body同步時候虛擬賬號,后面是密碼文件---> <auth start="false" users="root" passwordfile="/etc/rsync.pas"/>33c33< <timeout start="true" time="100"/><!-- timeout=100 --> #true 才能生效---> <timeout start="false" time="100"/><!-- timeout=100 -->36c36< <failLog path="/usr/local/sersync/log/rsync_fail_log.sh" timeToExecute="60"/><!--default every 60mins execute once--> #檢測rsync進程判斷,沒有自動啟---> <failLog path="/tmp/rsync_fail_log.sh" timeToExecute="60"/><!--default evePry 60mins execute once-->
新聞熱點


疑難解答