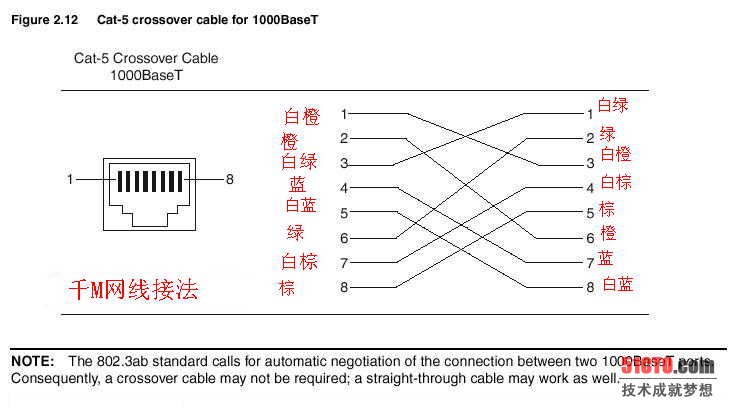
前言
餅圖是許多人最熟悉的圖表類型,也是使用頻率最高的圖表類型之一,本文主要給大家介紹了關于利用kotlin實現餅圖的相關內容,分享出來供大家參考學習,代碼不難,所以打算用kotlin來實現,增加熟練度,下面來一起看看吧。
先看看做的是什么

看完圖,我們來整理下思路
思路清晰后就擼起袖子加油干
知識點
我們先來了解一個概念,我們在paint畫扇形的時候,對應的度數是在哪個位置呢?

看到圖后應該明白了吧
繪制餅圖
我們先來看看他的參數,很明顯,左、上、右、下參數形成一個面板,startAngle 為起始的角度,sweepAngle 為從起始角度開始繪制多少度,useCenter為是否連接到圓心,paint為畫筆
public void drawArc(float left, float top, float right, float bottom, float startAngle, float sweepAngle, boolean useCenter, @NonNull Paint paint) { super.drawArc(left, top, right, bottom, startAngle, sweepAngle, useCenter, paint); }我們以當前控件的width、height為面板來畫一個圓形的餅圖
@RequiresApi(Build.VERSION_CODES.LOLLIPOP) override fun onDraw(canvas: Canvas) { super.onDraw(canvas) canvas.drawArc(0f, 0f, width, height, 0f, 360f, true, paintRed) }哇塞,好丑哦,結果顯示的是一個橢圓,如果要繪制一個圓形的餅圖,我們必須得保證left=top=right=bottom

設置餅圖居中
/** * view的寬度 */ var width: Float = 0f /** * view的高度 */ var height: Float = 0f /** * drawArc距離左邊的距離 */ var left: Float = 0f /** * drawArc距離上邊的距離 */ var top: Float = 0f /** * drawArc距離右邊的距離 */ var right: Float = 0f /** * drawArc距離下邊的距離 */ var bottom: Float = 0f @RequiresApi(Build.VERSION_CODES.LOLLIPOP) override fun onDraw(canvas: Canvas) { super.onDraw(canvas) canvas.drawArc(left, top, right, bottom, 0f, 360f, true, paint) } override fun onSizeChanged(w: Int, h: Int, oldw: Int, oldh: Int) { super.onSizeChanged(w, h, oldw, oldh) setBackgroundColor(resources.getColor(R.color.black)) width = w.toFloat() height = h.toFloat() left = width / 4f top = width / 4f right = width - left bottom = width - top }完美居中

接下來,我們要把上面從0度到360度多分幾個步驟來繪制
@RequiresApi(Build.VERSION_CODES.LOLLIPOP) override fun onDraw(canvas: Canvas) { super.onDraw(canvas) ... canvas.drawArc(left, top, right, bottom, 0f, 20f, true, paintPuple) canvas.drawArc(left, top, right, bottom, 20f, 10f, true, paintGray) canvas.drawArc(left, top, right, bottom, 30f, 40f, true, paintGreen) canvas.drawArc(left, top, right, bottom, 70f, 110f, true, paintBlue) canvas.drawArc(left, top, right, bottom, 180f, 110f, true, paintRed) canvas.drawArc(left, top, right, bottom, 290f, 70f, true, paintYellow) }還不錯
上圖的度數是寫死的,現在我們來把他寫活
提供一個設置個數的集合,比如農名伯伯賣水果,梨子賣了10個,香蕉賣了3個,蘋果賣了7個,那么這個個數的集合為pieList=(10,3,7)。
因為餅圖是根據角度來繪制的,我們必須將這個個數集合換算成角度集合,換算的過程中我們需要知道每一種水果所占總水果的比例,然后通過這個比例去乘上360度,就知道每一種水果所占的度數。
梨子的占比為10/(10+3+7)=1/2,可得梨子占餅圖的度數為1/2*360=180度,按照這種方式計算,香蕉和蘋果占餅圖的度數分別為54度和126度,那么,餅圖的分布也就出來了
現在,我們來定義一個個數集合,計算出比例的集合和度數的集合,下面是比例的集合,度數的集合我們在繪制的時候再去計算
/** * 個人分類集合 */ var pieList = arrayListOf(10f,3f,7f) /** * 餅圖所占的比例 */ var scaleList = arrayListOf<Float>() /** * 個數分類的總量 */ var total: Float = 0f override fun onSizeChanged(w: Int, h: Int, oldw: Int, oldh: Int) { super.onSizeChanged(w, h, oldw, oldh) //計算個數的總和 total = pieList.sum() //存儲比例值 for (a in pieList) { scaleList.add(a.div(total)) } }比例集合拿到了,接下來,我們去循環這個比例值,然后將比例值乘上360度,計算出角度值,供drawArc的sweepAngle使用,但是,我們還缺少一個startAngle起始角度,我們可以定義一個起始角度為0度,然后每次根據計算出的角度值sweepAngle去累加起始度數,用代碼來實現下
/** * 記錄當前畫餅圖的度數 */ var currentDegree: Float = 0f /** * 累加餅圖的度數作為下一個繪制的起始度數 */ var srctorDegree: Float = 0f @RequiresApi(Build.VERSION_CODES.LOLLIPOP) override fun onDraw(canvas: Canvas) { super.onDraw(canvas) for (scale in scaleList) { val paint = Paint() paint.strokeWidth = dip(10.0f).toFloat() paint.isAntiAlias = true //定義一個隨機生成的顏色數,來區分不同的扇形區域 val hex = "#" + Integer.toHexString((-16777216 * Math.random()).toInt()) paint.color = Color.parseColor(hex) //角度數 srctorDegree = scale * 360 canvas.drawArc(left, top, right, bottom, currentDegree, srctorDegree, true, paint) //累加角度 currentDegree += srctorDegree } }ok,現在我們可以隨機的去定義個數來生成占比的餅圖了

繪制折線
接下來,我們來繪制折線,折線的起點是每個扇形弧上的一半,path的arcTo方法也可以繪制圓,且方法參數使用也是一樣,我們可以讓arcTo跟著canvas.drawArc一塊畫,arcTo的startAngle起始角度為canvas.drawArc起始角度加上sweepAngle度數的一半,這樣,就定位到了弧邊的一半,arcTo的sweepAngle為0就行了,我們只定位,不繪制
... canvas.drawArc(left, top, right, bottom, currentDegree, srctorDegree, true, paint) val path = Path() path.arcTo(left, top, right, bottom, currentDegree + srctorDegree / 2, 0f, false) ...
現在,path的位置定位到弧邊的一半了,接下來,我們要知道當前path的坐標然后根據坐標去繪制折線,
val bounds = RectF() //將path當前的坐標賦值給bounds path.computeBounds(bounds, true)
現在拿到坐標了,我們再來看看效果圖,折線和文字呈四個方向,我們不如把餅圖分成四個區域,以圓心為坐標軸原點,切分四個象限:
那么,接下來就是如何判斷當前起始點在哪個象限了,先以第一象限為例,如果當前的坐標大于餅圖橫軸方向一半,并且小于餅圖縱軸方向的一半,那么就是第一象限,其他依次類推
/** * 橫線的長度 */ var lineae: Int = 30 /** * 斜線的長度 */ var slantLine: Int = 30 override fun onSizeChanged(w: Int, h: Int, oldw: Int, oldh: Int) { super.onSizeChanged(w, h, oldw, oldh) //計算橫線的比例 lineae = (width / 30f).toInt() //計算斜線的比例 slantLine = (width / 40f).toInt() } @RequiresApi(Build.VERSION_CODES.LOLLIPOP) override fun onDraw(canvas: Canvas) { super.onDraw(canvas) for (scale in scaleList) { ... val path = Path() path.arcTo(left, top, right, bottom, currentDegree + srctorDegree / 2, 0f, false) val bounds = RectF() path.computeBounds(bounds, true) //第一象限 if (bounds.left >= width / 2 && bounds.top <= width / 2) { path.lineTo(bounds.left + lineae, bounds.top) path.lineTo(bounds.left + lineae + slantLine, bounds.top - slantLine) canvas.drawPath(path, paintLine) //第二象限 } else if (bounds.left <= width / 2 && bounds.top <= width / 2) { path.lineTo(bounds.left - lineae, bounds.top) path.lineTo(bounds.left - lineae - slantLine, bounds.top - slantLine) canvas.drawPath(path, paintLine) //第三象限 } else if (bounds.left <= width / 2 && bounds.top >= width / 2) { path.lineTo(bounds.left - lineae, bounds.top) path.lineTo(bounds.left - lineae - slantLine, bounds.top + slantLine) canvas.drawPath(path, paintLine) //第四象限 } else { path.lineTo(bounds.left + lineae, bounds.top) path.lineTo(bounds.left + lineae + slantLine, bounds.top + slantLine) canvas.drawPath(path, paintLine) } } ... } 
哎呀,出來了
繪制文字
接下來就是繪制文字了,第一、四象限還好,文字可以在折線后面跟著畫,但是二、三象限的文字就不允許了,我們必須往前移動文字寬度的距離才能完美銜接到折線上,所以,我們來定義一個計算文字的方法
/** * 獲取文字的寬度 */ private fun getStringWidth(str: String): Float = paintLine.measureText(str)
文字是會隨著餅圖的大小進行改變的,所以設置文字大小的比例
paintLine.textSize = dip(width / 100).toFloat()
接下來就開始繪制文字吧
@RequiresApi(Build.VERSION_CODES.LOLLIPOP) override fun onDraw(canvas: Canvas) { super.onDraw(canvas) ... //獲取當前的百分比文字 val textStr = String.format("%.2f%%", scale * 100) //獲取文字的寬度 val textWidth = getStringWidth(textStr) //第一象限 if (bounds.left >= width / 2 && bounds.top <= width / 2) { ... canvas.drawText(textStr, bounds.left + lineae + slantLine, bounds.top - slantLine, paintText) ... //第二象限 } else if (bounds.left <= width / 2 && bounds.top <= width / 2) { ... canvas.drawText(textStr, bounds.left - lineae - slantLine - textWidth, bounds.top - slantLine, paintText) ... //第三象限 } else if (bounds.left <= width / 2 && bounds.top >= width / 2) { ... canvas.drawText(textStr, bounds.left - lineae - slantLine - textWidth, bounds.top + lineae, paintText) ... //第四象限 } else { ... canvas.drawText(textStr, bounds.left + lineae + slantLine, bounds.top + slantLine, paintText) ... } }嗯,還不錯,

然后我們再看看效果圖,餅圖中間還有一塊與背景色一樣的黑圓,這不跟簡單了嘛
//定義中間黑圓的畫筆 paintCicle.color = resources.getColor(R.color.black) paintCicle.isAntiAlias = true paintCicle.style = Paint.Style.FILL @RequiresApi(Build.VERSION_CODES.LOLLIPOP) override fun onDraw(canvas: Canvas) { super.onDraw(canvas) ... //在循環結束餅圖的時候,以餅圖的原點為中心畫圓 canvas.drawCircle(width / 2, width / 2, width / 8, paintCicle) } 
然后我們暴露一個方法,提供給Activity去調用
/** * 設置扇形參數 */ fun setPieData(a: ArrayList<Float>) { pieList.clear() pieList.addAll(a) invalidate() }那么,Activity就可以這么去調用了
override fun onCreate(savedInstanceState: Bundle?) { super.onCreate(savedInstanceState) setContentView(R.layout.activity_second) pie1.setPieData(arrayListOf(1f,10f,15f,9f,15f)) pie2.setPieData(arrayListOf(3f,8f,15f,7f,9f)) pie3.setPieData(arrayListOf(9f,3f,7f,3f,4f,2f,1f)) } 
總結
以上就是這篇文章的全部內容了,希望本文的內容對大家的學習或者工作具有一定的參考學習價值,如果有疑問大家可以留言交流,謝謝大家對VeVb武林網的支持。
新聞熱點


疑難解答