首先在oracle官方上下載一個oracle 11g(特別說明一下在安裝CentOS 5.2時盡量是把開發(fā)包裝全一些,這樣您在安裝包檢測的時候就會少裝一些包。還有一點:安裝大概需要5G多的空間,空間不夠就老是出錯。)
1、用unzip解壓 Oracle 11g文件
unzip linux_x86_11gR1_database.zip
(這個您也可以在Windows下面解壓,不過您要加載過來,如果你的分區(qū)是NTFS,那您就要安裝kernel-module-ntfs、fuse、ntfs-3g,當然具體的怎么操作就不必多說了。如果您還是搞不定的話,請給QQ:42271520留言。)
2、安裝包檢測及安裝
在終端中執(zhí)行: rpm -q gcc make binutils setarch compat-db compat-gcc compat-gcc-c++ compat-libstdc++ compat-libstdc++-devel unixODBC unixODBC-devel libaio-devel sysstat
顯示結(jié)果如下:
vel sysstat
gcc-4.1.2-42.el5
make-3.81-3.el5
binutils-2.17.50.0.6-6.el5
setarch-2.0-1.1
package compat-db is not installed
package compat-gcc is not installed
package compat-gcc-c++ is not installed
package compat-libstdc++ is not installed
package compat-libstdc++-devel is not installed
unixODBC-2.2.11-7.1
package unixODBC-devel is not installed
package libaio-devel is not installed
package sysstat is not installed
分析:
上面package 軟件包 is not installed 部分說明此軟件包沒有安裝,您可以再光盤里面找,再用rpm -ivh 安裝就行,這些包在centos安裝盤中都用;或者直接用yum install 軟件包 來安裝,具體操作如下:
yum install compat-db
安裝成功Installed: compat-db.i386 0:4.2.52-5.1 Complete!
yum install compat* (這個包比較多,要稍等一會,不急先抽根煙吧。)
安裝成功 Installed: compat*......... Complete!
yum install unixODBC-devel
安裝成功 Installed: unixODBC-devel.i386 0:2.2.11-7.1 Complete!
yum install libaio-devel
安裝成功 Installed: libaio-devel.i386 0:0.3.106-3.2 Complete!
yum install sysstat
安裝成功 Installed: sysstat.i386 0:7.0.2-1.el5 Complete!
說明:您可以再執(zhí)行一次rpm -q 軟件包組合 具體如下:
gcc-4.1.2-42.el5
make-3.81-3.el5
binutils-2.17.50.0.6-6.el5
setarch-2.0-1.1
compat-db-4.2.52-5.1
package compat-gcc is not installed
package compat-gcc-c++ is not installed
package compat-libstdc++ is not installed
package compat-libstdc++-devel is not installed
unixODBC-2.2.11-7.1
unixODBC-devel-2.2.11-7.1
libaio-devel-0.3.106-3.2
sysstat-7.0.2-1.el5
如上所述:還是有4個軟件包沒有安裝,這個不用理會,其實我們剛才安裝的compat包已經(jīng)包含了;可以繼續(xù)下一步了。
3、系統(tǒng)參數(shù)和用戶及目錄設置
//系統(tǒng)參數(shù)設置
vi /etc/sysctl.conf
以下為此文件更改后的內(nèi)容:
# Kernel sysctl configuration file for Red Hat Linux
#
# For binary values, 0 is disabled, 1 is enabled.See sysctl(8) and
# sysctl.conf(5) for more details.
# Controls IP packet forwarding
net.ipv4.ip_forward = 0
# Controls source route verification
net.ipv4.conf.default.rp_filter = 1
# Do not accept source routing
net.ipv4.conf.default.accept_source_route = 0
# Controls the System Request debugging functionality of the kernel
kernel.sysrq = 0
# Controls whether core dumps will append the PID to the core filename
# Useful for debugging multi-threaded applications
kernel.core_uses_pid = 1
# Controls the use of TCP syncookies
net.ipv4.tcp_syncookies = 1
# Controls the maximum size of a message, in bytes
#kernel.msgmnb = 65536
# Controls the default maxmimum size of a mesage queue
#kernel.msgmax = 65536
# Controls the maximum shared segment size, in bytes
#kernel.shmmax = 4294967295
# Controls the maximum number of shared memory segments, in pages
#kernel.shmall = 268435456
#Below for oracle11g
kernel.core_uses_pid = 1
kernel.shmmax = 536870912
kernel.shmmni = 4096
kernel.shmall = 2097152
kernel.sem = 250 32000 100 128
net.core.rmem_default = 4194304
net.core.rmem_max = 4194304
net.core.wmem_default = 262144
net.core.wmem_max = 262144
fs.file-max = 6553600
net.ipv4.ip_local_port_range = 1024 65000
//添加用戶組及用戶
執(zhí)行如下命令:
#groupadd dba
#groupadd oinstall
#useradd oracle -g oinstall -G dba
#passwd oracle
//新建目錄權(quán)限
執(zhí)行如下命令:
#mkdir -p /u01
#chown -R oracle:dba /u01
#chmod -R 755 /u01
//用戶環(huán)境變量
先切換用戶到oracle:
su – oracle
修改.bash_profile文件:
vi .bash_profile
以下是此文件的內(nèi)容:
# .bash_profile
# Get the aliases and functions
if [ -f ~/.bashrc ]; then
. ~/.bashrc
fi
# User specific environment and startup programs
PATH=$PATH:HOME/bin
export ORACLE_BASE=/u01/app/oracle
export ORACLE_HOME=$ORACLE_BASE/product/11.1.0.6
export ORACLE_SID=sales
export PATH=$PATH:$ORACLE_HOME/bin:$ORACLE_HOME/Apache/Apache/bin
export TNS_ADMIN=$ORACLE_HOME/network/admin
export LD_LIBRARY_PATH=$LD_LIBRARY_PATH:ORACLE_HOME/lib
export NLS_LANG=AMERICAN_AMERICA.ZHS16GBK
export ORA_NLS10=$ORACLE_HOME/nls/data
unset USERNAME
umask 022
4、安裝oracle
注銷root ;
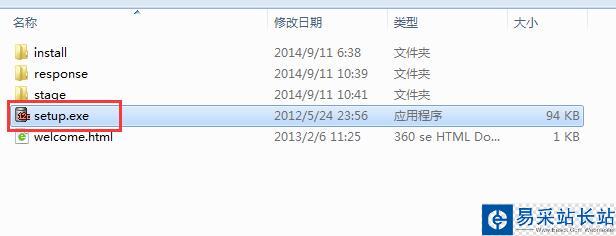
用oracle帳號進入,進入Oracle所在的目錄我的是/disk/Oracle11g-linux_x86
[oracle@root-bs Oracle11g-linux_x86]$ ls
doc install response runInstaller stage welcome.html
執(zhí)行./runInsaller進行安裝:
")
[oracle@root-bs Oracle11g-linux_x86]$ ./runInstaller
")
")
")
")
")
")
")
")
")
")
")
")
")
")
")
")
//最后再做幾下修改就大功告成了:
vi /u01/app/oracle/producte/11.1.0.6/bin/dbshut
把ORACLE_HOME_LISTNER=$1改成ORACLE_HOME_LISTNER=$ORACLE_HOME
vi /u01/app/oracle/producte/11.1.0.6/bin/dbstart
把ORACLE_HOME_LISTNER=$1改成ORACLE_HOME_LISTNER=$ORACLE_HOME
vi /etc/oratab
把sales:/u01/app/oracle/product/11.1.0.6:N 改成ales:/u01/app/oracle/product/11.1.0.6:Y
好了,到此Oracle 11g安裝完成了,安裝的是否成功測試一下就知道了(等不急了......)。
5、測試oracle
[oracle@root-bs Oracle11g-linux_x86]$ dbstart
Processing Database instance "sales": logfile /u01/app/oracle/product/11.1.0.6/
startup.log
[oracle@root-bs Oracle11g-linux_x86]$ sqlplus /nolog
SQL*Plus: Release 11.1.0.6.0 - Production on Wed Sep 24 13:57:51 2008
Copyright (c) 1982, 2007, Oracle. All rights reserved.
SQL> conn / as sysdba
Connected.
SQL> startup
ORA-01081: cannot start already-running ORACLE - shut it down first
此提示說明服務已經(jīng)運行不必再重新啟動了。如果出現(xiàn)如下錯誤:
ORA-01078: failure in processing system parameters
LRM-00109: could not open parameter file '/u01/app/oracle/product/11.1.0.6/dbs/initsales.ora'
說明沒有找到Oracle實例,請重新創(chuàng)建實例:
[oracle@root-bs Oracle11g-linux_x86]$ netca
")
具體步驟不再多說
[oracle@root-bs Oracle11g-linux_x86]$ dbca
創(chuàng)建數(shù)據(jù)庫:
")
具體步驟不再多說
總述:到此安裝步驟已經(jīng)寫晚了,第一次寫這么詳細的步驟,寫的比較匆忙,不足之處請大伙諒解,寫這個步驟主要是不想讓初學者們不要走這么多的彎路,盡可能的把我所知道的全部貢獻給大家,希望能帶給大伙一點點的幫助。
")
新聞熱點


疑難解答
圖片精選