頂部指示器?
這是什么?
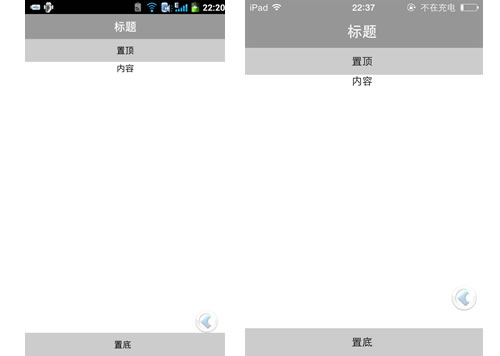
好吧,我承認這是我自己想出來的詞,因為我不知道它有什么學名,究竟是什么呢?看下這個圖就知道了。

這是我們的美工MM畫的,偶的神吶,這雖然很漂亮,不過也讓人頭疼,這個箭頭應該在滾到頂部的時候消失,滾下來的時候(即有條目隱藏的時候)才顯示,類似的底部指示器也要有這樣的效果。事實上默認的ListView和ScrollView都已經有了類似的效果,在頂部或底部還有更多內容時,會有部分漸變虛化的效果,不過美工已經設計了這樣的效果,那么我們就來做吧。
出于省事的目的,本教程中的例子會基于上一篇教程來修改,主要是添加1個繼承自ListView的類,以及修改布局定義文件。
ArrowListView控件的編寫
package net.learningandroid.lib.view; import net.learningandroid.lib.R;import android.content.Context;import android.graphics.Bitmap;import android.graphics.Canvas;import android.graphics.Paint;import android.graphics.Rect;import android.graphics.drawable.BitmapDrawable;import android.util.AttributeSet;import android.util.Log;import android.view.View;import android.widget.ListView; /** * 支持上下箭頭的ListView * * <a class="referer" target="_blank">@author</a> Mr. Lu */public class ArrowListView extends ListView { private final float scale = getContext().getResources().getDisplayMetrics().density; private float topArrowPadding; private float bottomArrowPadding; private static float DEFAULT_TOP_PADDING_DP = 2.0f; private static float DEFAULT_BOTTOM_PADDING_DP = 2.0f; public ArrowListView(Context context, AttributeSet attrs) { super(context, attrs); String strTopArrowPadding = attrs.getAttributeValue(null, "topArrowPadding"); String strBottomArrowPadding = attrs.getAttributeValue(null, "bottomArrowPadding"); topArrowPadding = convertDisplayUom(strTopArrowPadding, DEFAULT_TOP_PADDING_DP); bottomArrowPadding = convertDisplayUom(strBottomArrowPadding, DEFAULT_BOTTOM_PADDING_DP); Log.v("ArrowListView", String.valueOf(topArrowPadding)); } /** * 單位轉換 */ private float convertDisplayUom(String sour, float defaultValue) { try { if (sour.toLowerCase().endsWith("px")) { return Float.parseFloat(sour.toLowerCase().replace("px", "")); } else if (sour.toLowerCase().endsWith("dp")) { return Integer.parseInt(sour.toLowerCase().replace("dp", "")) * scale + 0.5f; } } catch (Exception e) { } return (defaultValue * scale + 0.5f); } /** * onDraw方法,根據ListView滾動位置繪出箭頭. */ @Override protected void onDraw(Canvas canvas) { super.onDraw(canvas); Paint paint = new Paint(); // 取得箭頭的圖片,此處是固定圖片,其實上可以做成配置方式 Bitmap topPic = ((BitmapDrawable) getResources().getDrawable( R.drawable.arrow_up)).getBitmap(); Bitmap bottomPic = ((BitmapDrawable) getResources().getDrawable( R.drawable.arrow_down)).getBitmap(); // 取得ListView的繪制區(qū)域大小 Rect r = new Rect(); this.getDrawingRect(r); // 計算箭頭的繪制位置 float top = r.top + topArrowPadding; float bottom = r.bottom - bottomArrowPadding - bottomPic.getHeight(); float left = r.left + (r.right - r.left - topPic.getWidth()) / 2; // 計算是否需要繪制 boolean drawTop = false; boolean drawBottom = false; if (this.getChildCount() > 0) { Rect rTop = new Rect(); this.getChildAt(0).getLocalVisibleRect(rTop); Rect rBottom = new Rect(); View lastChild = this.getChildAt(this.getChildCount() - 1); lastChild.getLocalVisibleRect(rBottom); drawTop = (this.getFirstVisiblePosition() > 0 || this .getFirstVisiblePosition() == 0 && rTop.top > 0); drawBottom = (this.getLastVisiblePosition() < this.getAdapter() .getCount() - 1 || this.getLastVisiblePosition() == this .getAdapter().getCount() - 1 && rBottom.bottom < lastChild.getHeight()); } // 繪出箭頭 if (drawTop) { canvas.drawBitmap(topPic, left, top, paint); } if (drawBottom) { canvas.drawBitmap(bottomPic, left, bottom, paint); } }}就要點解釋一下上面這段代碼:
注意構造方法,我們必須繼承public ArrowListView(Context context, AttributeSet attrs),這樣才可以讓這個類在xml定義文件中使用。
還要注意到,這里用了attrs.getAttributeValue來讀取XML定義文件中的屬性,其實有更好的方法,容我下次再講解,這里先偷個懶。
convertDisplayUom方法是用來將dp轉換成px的,可以看到由于我們用了getAttributeValue的方式,所以需要手動將String轉成Float,很麻煩。
最后就是onDraw啦,計算出畫箭頭的位置,畫出來就行了。
接下來就是布局文件的編寫了
ArrowListView在XML文件中的使用
<?xml version="1.0" encoding="utf-8"?><LinearLayout xmlns:android="http://schemas.android.com/apk/res/android" android:layout_width="fill_parent" android:layout_height="fill_parent" android:orientation="vertical" > <TextView android:text="Arrow List View Sample" android:layout_width="fill_parent" android:layout_height="wrap_content" /> <net.learningandroid.lib.view.ArrowListView android:id="@+id/arrowListView" android:layout_width="fill_parent" android:layout_height="wrap_content" android:paddingTop="15dp" android:paddingBottom="20dp" android:layout_margin="10dp" android:background="@drawable/float_panel" android:layout_weight="1" android:cacheColorHint="#FFEDEDED" android:divider="#00EDEDED" topArrowPadding="5dp" bottomArrowPadding="10dp" /></LinearLayout>
這里需要注意的是自定義控件和其中的屬性的寫法,不再是ListView了,而是你自己編寫的控件類的類名。其它的內容就是定義padding,background,以及取消了分隔線的顯示。
用這個布局文件替代上一篇教程中的布局文件,但Adapter的定義不變,因為ArrowListView是繼承自ListView的,所以原先的Adapter的使用是一樣的。
最后我們來看下效果:

如何?只需要小心的調整ListView的Padding和ArrowPadding的值就可以控制箭頭出現的位置,如果需要控制更多,比如更換圖片,或者當頂部無內容時讓箭頭變暗、有內容時變亮,都可以用同樣的方法。
并且,如果修改了Attribute的讀取方法之后,還可以通過xml文件來指定箭頭的圖片。
新聞熱點


疑難解答
圖片精選