在Android3.0上開(kāi)始引入了一個(gè)新概念叫Fragment。它有自己的布局文件,可以作為組件排布,也可以相互組合去實(shí)現(xiàn)不同的布局顯示。使用Fragment可以重復(fù)利用代碼,并且可以滿足不同設(shè)備尺寸的需求。Fragment不能單獨(dú)存在,只能存在于Activity中,而一個(gè)Activity可以擁有多個(gè)Fragment。很重要的一點(diǎn)是,F(xiàn)ragment可以和Activity中的其它組件一起使用,無(wú)需重寫(xiě)所有Activity的接口。所以使用Fragment就可以這樣來(lái)完成上例中“主界面―詳細(xì)界面”的APP需求。
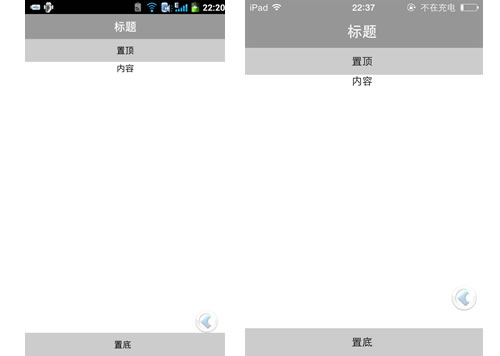
在手機(jī)上是這樣顯示的:

而在平板上是這樣的:

在一個(gè)小屏幕的設(shè)備上,一個(gè)activity通常占據(jù)了整個(gè)屏幕,同時(shí)顯示各種UI視圖組件。Activity實(shí)際上就是視圖的容器。然后,當(dāng)一個(gè)activity被顯示在一個(gè)大屏幕的設(shè)備上,例如平板電腦,總會(huì)顯得有些不適應(yīng)。因?yàn)槠聊惶罅耍琣ctivity中的所有UI組件要充滿整個(gè)屏幕,這樣一來(lái),視圖的層次結(jié)構(gòu)就很復(fù)雜了。一個(gè)更好的辦法是使用一種“輕量級(jí)”的activity,每個(gè)“輕量級(jí)”activity包含自己的視圖,互不干擾。在運(yùn)行期間,根據(jù)屏幕的方向和尺寸,一個(gè)activity可以包含一個(gè)或多個(gè)“輕量級(jí)”activity。在Android3.0以上的版本,這種“輕量級(jí)”的activity叫做Fragment.
怎么創(chuàng)建一個(gè)Fragment
現(xiàn)在我們了解了Fragment的生命周期了,接著我們就需要知道怎么創(chuàng)建一個(gè)Fragment并綁定到Activity中,第一件要做的事就是繼承android.app.Fragment來(lái)寫(xiě)一個(gè)Fragment,假設(shè)我們的Fragment叫做Fragment1,創(chuàng)建和定義如下:
public class Fragment1 extends Fragment {...}就像我們上面說(shuō)的,F(xiàn)ragment只能存在于Activity中,所以我們必須要在某處定義它,有兩種方式:
- 直接在xml布局文件中定義;
- 在xml布局文件中定義一個(gè)占位符,然后動(dòng)態(tài)地在Activity中操作Fragment;
我們定義Fragment的方式會(huì)影響它的生命周期,因?yàn)樵谏鲜龅谝环N情況下onInflate方法會(huì)被調(diào)用,而第二種情況下它的生命周期是從onAttach方法開(kāi)始的。
如果我們?cè)赬ML文件中定義Fragment的話,我們需要:
<fragment android:id="@+id/f1" class="com.survivingwithandroid.fragment.Fragment1" android:layout_width="match_parent" android:layout_height="20dp"/>
然而如果我們?cè)赬ML中用占位符的話,需要再做一些工作。
布局框架和Fragment
如果我們?cè)赬ML布局文件中定義Fragment的話,就不能自由、動(dòng)態(tài)修改Fragment了,還有別的方法可以讓我們可以更靈活地操作:使用時(shí)需要在XML文件中定義:
<FrameLayout android:id="@+id/fl1" android:layout_width="match_parent" android:layout_height="200dp"/>
在Activity里面還需要做一點(diǎn)工作,因?yàn)槲覀儽仨毷謩?dòng)初始化Fragment,然后把它“插入”到FrameLayout中。
public class MainActivity extends Activity { @Overrideprotected void onCreate(Bundle savedInstanceState) { super.onCreate(savedInstanceState); setContentView(R.layout.activity_main); Fragment2 f2 = new Fragment2(); FragmentTransaction ft = getFragmentManager().beginTransaction(); ft.replace(R.id.fl1, f2); ft.commit();}例子
可以把Fragment想象成Activity的另外一種形式。你創(chuàng)建fragments去包含UI組件,就像創(chuàng)建activities那樣。但是,F(xiàn)ragment總是被嵌在Activity中。
下面來(lái)通過(guò)一個(gè)例子看一下流程:
1.創(chuàng)建一個(gè)名為Fragments的工程。
2.在res/layout文件夾下,新建一個(gè)叫fragment1.xml的文件。
<?xml version="1.0" encoding="utf-8"?> <LinearLayout xmlns:android="http://schemas.android.com/apk/res/android" android:layout_width="fill_parent" android:layout_height="fill_parent" android:background="#00FF00" android:orientation="vertical" > <TextView android:id="@+id/lblFragment1" android:layout_width="fill_parent" android:layout_height="wrap_content" android:text="This is fragment #1" android:textColor="#000000" android:textSize="25sp" /> </LinearLayout>
3.在res/layout文件夾下,新建一個(gè)叫fragment2.xml的文件。
<?xml version="1.0" encoding="utf-8"?> <LinearLayout xmlns:android="http://schemas.android.com/apk/res/android" android:layout_width="fill_parent" android:layout_height="fill_parent" android:background="#FFFE00" android:orientation="vertical" > <TextView android:layout_width="fill_parent" android:layout_height="wrap_content" android:text="This is fragment #2" android:textColor="#000000" android:textSize="25sp" /> <Button android:id="@+id/btnGetText" android:layout_width="wrap_content" android:layout_height="wrap_content" android:onClick="onClick" android:text="Get text in Fragment #1" android:textColor="#000000" /> </LinearLayout>
4.main.xml中的代碼。
<?xml version="1.0" encoding="utf-8"?> <LinearLayout xmlns:android="http://schemas.android.com/apk/res/android" android:layout_width="fill_parent" android:layout_height="fill_parent" android:orientation="horizontal" > <fragment android:id="@+id/fragment1" android:name="net.learn2develop.Fragments.Fragment1" android:layout_width="0px" android:layout_height="match_parent" android:layout_weight="1" /> <fragment android:id="@+id/fragment2" android:name="net.learn2develop.Fragments.Fragment2" android:layout_width="0px" android:layout_height="match_parent" android:layout_weight="1" /> </LinearLayout>
5.新建兩個(gè)類(lèi):Fragment1.java和Fragment2.java。
6.Fragment1.java中的代碼。
package net.learn2develop.Fragments; import android.app.Activity; import android.app.Fragment; import android.os.Bundle; import android.util.Log; import android.view.LayoutInflater; import android.view.View; import android.view.ViewGroup; public class Fragment1 extends Fragment { @Override public View onCreateView(LayoutInflater inflater, ViewGroup container, Bundle savedInstanceState) { Log.d("Fragment 1", "onCreateView"); // ---Inflate the layout for this fragment--- return inflater.inflate(R.layout.fragment1, container, false); } } 7.Fragment2.java中的代碼。
package net.learn2develop.Fragments; import android.app.Fragment; import android.os.Bundle; import android.view.LayoutInflater; import android.view.View; import android.view.ViewGroup; import android.widget.Button; import android.widget.TextView; import android.widget.Toast; public class Fragment2 extends Fragment { @Override public View onCreateView(LayoutInflater inflater, ViewGroup container, Bundle savedInstanceState) { // ---Inflate the layout for this fragment--- return inflater.inflate(R.layout.fragment2, container, false); } } 新聞熱點(diǎn)


疑難解答
圖片精選