用PLT比較輕量級,用opencv是比較重量級
import numpy as npfrom PIL import Imageif __name__ == '__main__': image_file = '/Users/mac/Documents/學習文檔/機器學習/5.Package/son.png' height = 100 #假定寫入圖片的高度是100 img = Image.open(image_file) img_width, img_height = img.size #獲取img的尺寸 width = 2 * height * img_width // img_height # 假定字符的高度是寬度的2倍,寫入圖片的高度是寬度的2倍 img = img.resize((width, height), Image.ANTIALIAS) #改變尺寸,將新定的寬度,高度重定img的size賦給img pixels = np.array(img.convert('L')) #轉成灰度值喂給array,pixels是個存灰度值的數組 print(pixels.shape) print(pixels) chars = "MNHQ$OC?7>!:-;. " #256色的不同通道濃淡,M代表0-15,N代表16-31 N = len(chars) step = 256 // N print(N) print step result = '' for i in range(height): for j in range(width): result += chars[pixels[i][j] // step] #像素點的值除以step是可以找到step這個像素點的位置,char做素引,是指對應的該 #點的值填充成上面更濃的色,故就顯示出來了 result += '/n' with open('text.txt', mode='w') as f: f.write(result)用PIT詳解步驟:
img = Image.open(path)#打開圖片
img.getpixel((height, width))#得到(height, width)處的像素值(可能是一個list,3通道)
img.convert("L")#轉灰度圖 
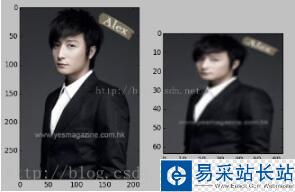
size = (64, 64) img.resize(size, Image.ANTIALIAS)#改變尺寸
box = (10, 10, 100, 100) img.crop(box).show#在img上的box處截圖,show顯示圖片

#shape[0]-1梯度下降的辦法取x,y值,再將img_data[x][y][0]x,y處0通道賦255色值img_data = np.array(img) for i in xrange(300): x = random.randint(0, img_data.shape[0]-1) y = random.randint(0, img_data.shape[1]-1) #shape[0]是表幾行,shape[1]表示幾列,y在列向量上故用shape[1] img_data[x][y][0] = 255 img = Image.fromarray(img_data)#加300個噪音,轉來轉去麻煩可以直接用skimage度圖片就不用轉了 img.show()
img.rotate(90)#圖片旋轉90
img.transpose(Image.FLIP_LEFT_RIGHT)#圖片鏡像
二、skimage打開的圖片img_data:
from skimage import io,transform img_data = io.imread(img_path) transform.resize(img_data, (64, 64))#改變尺寸
新聞熱點


疑難解答