一、數據集介紹
點擊打開鏈接17_Category_Flower 是一個不同種類鮮花的圖像數據,包含 17 不同種類的鮮花,每類 80 張該類鮮花的圖片,鮮花種類是英國地區常見鮮花。下載數據后解壓文件,然后將不同的花剪切到對應的文件夾,如下圖所示:
每個文件夾下面有80個圖片文件。
二、使用的工具
首先是在tensorflow框架下,然后介紹一下用到的兩個庫,一個是os,一個是PIL。PIL(Python Imaging Library)是 Python 中最常用的圖像處理庫,而Image類又是 PIL庫中一個非常重要的類,通過這個類來創建實例可以有直接載入圖像文件,讀取處理過的圖像和通過抓取的方法得到的圖像這三種方法。
三、代碼實現
我們是通過TFRecords來創建數據集的,TFRecords其實是一種二進制文件,雖然它不如其他格式好理解,但是它能更好的利用內存,更方便復制和移動,并且不需要單獨的標簽文件(label)。
1、制作TFRecords文件
import osimport tensorflow as tffrom PIL import Image # 注意Image,后面會用到import matplotlib.pyplot as pltimport numpy as np cwd = 'D:/PyCharm Community Edition 2017.2.3/Work/google_net/jpg//'classes = {'daffodil', 'snowdrop', 'lilyvalley', 'bluebell', 'crocus', 'iris', 'tigerlily', 'tulip', 'fritiuary', 'sunflower', 'daisy', 'coltsfoot', 'dandelion', 'cowslip', 'buttercup', 'windflower', 'pansy'} # 花為 設定 17 類writer = tf.python_io.TFRecordWriter("flower_train.tfrecords") # 要生成的文件 for index, name in enumerate(classes): class_path = cwd + name + '//' for img_name in os.listdir(class_path): img_path = class_path + img_name # 每一個圖片的地址 img = Image.open(img_path) img = img.resize((224, 224)) img_raw = img.tobytes() # 將圖片轉化為二進制格式 example = tf.train.Example(features=tf.train.Features(feature={ "label": tf.train.Feature(int64_list=tf.train.Int64List(value=[index])), 'img_raw': tf.train.Feature(bytes_list=tf.train.BytesList(value=[img_raw])) })) # example對象對label和image數據進行封裝 writer.write(example.SerializeToString()) # 序列化為字符串writer.close()
首先將文件移動到對應的路徑:
D:/PyCharm Community Edition 2017.2.3/Work/google_net/jpg
然后對每個文件下的圖片進行讀寫和相應的大小驚醒改變,具體過程是使用tf.train.Example來定義我們要填入的數據格式,其中label即為標簽,也就是最外層的文件夾名字,img_raw為易經理二進制化的圖片。然后使用tf.python_io.TFRecordWriter來寫入。基本的,一個Example中包含Features,Features里包含Feature(這里沒s)的字典。最后,Feature里包含有一個 FloatList, 或者ByteList,或者Int64List。就這樣,我們把相關的信息都存到了一個文件中,所以前面才說不用單獨的label文件。而且讀取也很方便。
執行完以上代碼就會出現如下圖所示的TF文件
2、讀取TFRECORD文件
制作完文件后,將該文件讀入到數據流中,具體代碼如下:
def read_and_decode(filename): # 讀入dog_train.tfrecords filename_queue = tf.train.string_input_producer([filename]) # 生成一個queue隊列 reader = tf.TFRecordReader() _, serialized_example = reader.read(filename_queue) # 返回文件名和文件 features = tf.parse_single_example(serialized_example, features={ 'label': tf.FixedLenFeature([], tf.int64), 'img_raw': tf.FixedLenFeature([], tf.string), }) # 將image數據和label取出來 img = tf.decode_raw(features['img_raw'], tf.uint8) img = tf.reshape(img, [224, 224, 3]) # reshape為128*128的3通道圖片 img = tf.cast(img, tf.float32) * (1. / 255) - 0.5 # 在流中拋出img張量 label = tf.cast(features['label'], tf.int32) # 在流中拋出label張量 return img, label注意,feature的屬性“label”和“img_raw”名稱要和制作時統一 ,返回的img數據和label數據一一對應。
3、顯示tfrecord格式的圖片
為了知道TF 文件的具體內容,或者是怕圖片對應的label出錯,可以將數據流以圖片的形式讀出來并保存以便查看,具體的代碼如下:
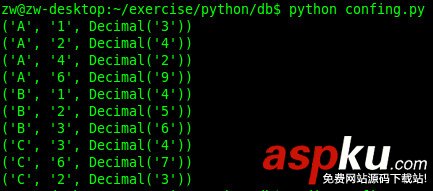
filename_queue = tf.train.string_input_producer(["flower_train.tfrecords"]) # 讀入流中reader = tf.TFRecordReader()_, serialized_example = reader.read(filename_queue) # 返回文件名和文件features = tf.parse_single_example(serialized_example, features={ 'label': tf.FixedLenFeature([], tf.int64), 'img_raw': tf.FixedLenFeature([], tf.string), }) # 取出包含image和label的feature對象image = tf.decode_raw(features['img_raw'], tf.uint8)image = tf.reshape(image, [224, 224, 3])label = tf.cast(features['label'], tf.int32)label = tf.one_hot(label, 17, 1, 0)with tf.Session() as sess: # 開始一個會話 init_op = tf.initialize_all_variables() sess.run(init_op) coord = tf.train.Coordinator() threads = tf.train.start_queue_runners(coord=coord) for i in range(100): example, l = sess.run([image, label]) # 在會話中取出image和label img = Image.fromarray(example, 'RGB') # 這里Image是之前提到的 img.save(cwd + str(i) + '_''Label_' + str(l) + '.jpg') # 存下圖片 print(example, l) coord.request_stop() coord.join(threads)執行以上代碼后,當前項目對應的文件夾下會生成100張圖片,還有對應的label,如下圖所示:
在這里我們可以看到,前80個圖片文件的label是1,后20個圖片的label是2。 由此可見,我們一開始制作tfrecord文件時,圖片分類正確。
完整代碼如下:
import osimport tensorflow as tffrom PIL import Image # 注意Image,后面會用到import matplotlib.pyplot as pltimport numpy as np cwd = 'D:/PyCharm Community Edition 2017.2.3/Work/google_net/jpg//'classes = {'daffodil', 'snowdrop', 'lilyvalley', 'bluebell', 'crocus', 'iris', 'tigerlily', 'tulip', 'fritiuary', 'sunflower', 'daisy', 'coltsfoot', 'dandelion', 'cowslip', 'buttercup', 'windflower', 'pansy'} # 花為 設定 17 類writer = tf.python_io.TFRecordWriter("flower_train.tfrecords") # 要生成的文件 for index, name in enumerate(classes): class_path = cwd + name + '//' for img_name in os.listdir(class_path): img_path = class_path + img_name # 每一個圖片的地址 img = Image.open(img_path) img = img.resize((224, 224)) img_raw = img.tobytes() # 將圖片轉化為二進制格式 example = tf.train.Example(features=tf.train.Features(feature={ "label": tf.train.Feature(int64_list=tf.train.Int64List(value=[index])), 'img_raw': tf.train.Feature(bytes_list=tf.train.BytesList(value=[img_raw])) })) # example對象對label和image數據進行封裝 writer.write(example.SerializeToString()) # 序列化為字符串writer.close() def read_and_decode(filename): # 讀入dog_train.tfrecords filename_queue = tf.train.string_input_producer([filename]) # 生成一個queue隊列 reader = tf.TFRecordReader() _, serialized_example = reader.read(filename_queue) # 返回文件名和文件 features = tf.parse_single_example(serialized_example, features={ 'label': tf.FixedLenFeature([], tf.int64), 'img_raw': tf.FixedLenFeature([], tf.string), }) # 將image數據和label取出來 img = tf.decode_raw(features['img_raw'], tf.uint8) img = tf.reshape(img, [224, 224, 3]) # reshape為128*128的3通道圖片 img = tf.cast(img, tf.float32) * (1. / 255) - 0.5 # 在流中拋出img張量 label = tf.cast(features['label'], tf.int32) # 在流中拋出label張量 return img, label filename_queue = tf.train.string_input_producer(["flower_train.tfrecords"]) # 讀入流中reader = tf.TFRecordReader()_, serialized_example = reader.read(filename_queue) # 返回文件名和文件features = tf.parse_single_example(serialized_example, features={ 'label': tf.FixedLenFeature([], tf.int64), 'img_raw': tf.FixedLenFeature([], tf.string), }) # 取出包含image和label的feature對象image = tf.decode_raw(features['img_raw'], tf.uint8)image = tf.reshape(image, [224, 224, 3])label = tf.cast(features['label'], tf.int32)label = tf.one_hot(label, 17, 1, 0)with tf.Session() as sess: # 開始一個會話 init_op = tf.initialize_all_variables() sess.run(init_op) coord = tf.train.Coordinator() threads = tf.train.start_queue_runners(coord=coord) for i in range(100): example, l = sess.run([image, label]) # 在會話中取出image和label img = Image.fromarray(example, 'RGB') # 這里Image是之前提到的 img.save(cwd + str(i) + '_''Label_' + str(l) + '.jpg') # 存下圖片 print(example, l) coord.request_stop() coord.join(threads)本人也是剛剛學習深度學習,能力有限,不足之處請見諒,歡迎大牛一起討論,共同進步!
以上這篇對python制作自己的數據集實例講解就是小編分享給大家的全部內容了,希望能給大家一個參考,也希望大家多多支持VEVB武林網。
新聞熱點


疑難解答