接著上篇java驗證碼制作(上篇)給大家介紹有關java驗證碼的相關知識!
方法三:

用開源組件Jcaptcha實現,與Spring組合使用可產生多種形式的驗證碼,JCaptcha 即為Java版本的 CAPTCHA 項目,其是一個開源項目,支持生成圖形和聲音版的驗證碼,在生成聲音版的驗證碼時,需要使用到 FreeTTS。而CAPTCHA 全稱 Completely Automated Public Turing Test to Tell Computers and Humans Apart,最早作為卡內基梅隆大學的一個科研項目,用于生成一個人類容易通過而計算機難以通過的測試,目前廣泛應用于網絡應用,用于阻止機器人發布垃圾信息。目前,JCaptcha 官方網站顯示有 2.0 版本,但二進制版只有 1.0 版可供下載。
首先我們需準備相應的jar包
JCaptcha 項目在實現中,還引用了 commons-collections 和 commons-logging 兩個開源項目,再加上 JCaptcha 本身的實現,我們共需要三個包,具體信息如下:
jcaptcha-2.0-all.jarcommons-logging-1.1.1.jarcommons-collections-3.2.jar
其次我們看下面web.xml中的關鍵配置信息:除配置了Jcaptcha組件的具體class路徑外,還配置了SubmitActionServlet這個用于比對驗證碼的servlet,并且都為二者做了映射,可理解為換了名字,分別為/jcaptcha.jpg和/submit.action調用組件或servlet時直接用這個映射名即可。
<servlet> <servlet-name>jcaptcha</servlet-name> <servlet-class>com.octo.captcha.module.servlet.image.SimpleImageCaptchaServlet</servlet-class> </servlet> <servlet> <servlet-name>submit</servlet-name> <servlet-class>com.octo.captcha.module.servlet.image.sample.SubmitActionServlet</servlet-class> </servlet> <servlet-mapping> <servlet-name>jcaptcha</servlet-name> <url-pattern>/jcaptcha.jpg</url-pattern> </servlet-mapping> <servlet-mapping> <servlet-name>submit</servlet-name> <url-pattern>/submit.action</url-pattern> </servlet-mapping>
web.xml
然后來看SubmitActionServlet怎么實現:由于導入了jcaptcha的組件包,所以直接調用其中封裝好的方法SimpleImageCaptchaServlet.validateResponse(request, userCaptchaResponse)來判斷驗證碼中的信息是否與提交的匹配,而不需要去考慮具體的實現過程。
public class SubmitActionServlet extends HttpServlet{ protected void doPost(HttpServletRequest request, HttpServletResponse response) throws ServletException, IOException { String userCaptchaResponse = request.getParameter("japtcha"); boolean captchaPassed = SimpleImageCaptchaServlet.validateResponse(request, userCaptchaResponse); if (captchaPassed) response.getWriter().write("captcha passed"); else { response.getWriter().write("captcha failed"); } response.getWriter().write("<br/><a href='index.jsp'>Try again</a>"); }}SubmitActionServlet最后我們看一下簡單的前臺調用:
<html> <body> <h>Simple Captcha Servlet sample</h> <form action="submit.action" method="post"> <img src="jcaptcha.jpg" /> <input type="text" name="japtcha" value="" /> <input type="submit"/> </form> </body> </html>
實現圖例:


方法四:
用開源組件kaptcha實現,同樣使用kaptcha需要下載其jar組件包,kaptcha 是一個非常實用的驗證碼生成工具。有了它,你可以生成各種樣式的驗證碼,因為它是可配置的。kaptcha工作的原理是調用 com.google.code.kaptcha.servlet.KaptchaServlet(可以看出他是谷歌的一個開源項目),生成一個圖片。同時將生成的驗證碼字符串放到 HttpSession中。
使用kaptcha可以方便的配置:
驗證碼的字體驗證碼字體的大小驗證碼字體的字體顏色驗證碼內容的范圍(數字,字母,中文漢字!)驗證碼圖片的大小,邊框,邊框粗細,邊框顏色驗證碼的干擾線(可以自己繼承com.google.code.kaptcha.NoiseProducer寫一個自定義的干擾線)驗證碼的樣式(魚眼樣式、3D、普通模糊……當然也可以繼承com.google.code.kaptcha.GimpyEngine自定義樣式)
……
對kaptcha的配置信息同樣的是放在了web.xml中:<init-param>標簽中即初始化的配置信息
<servlet> <servlet-name>Kaptcha</servlet-name> <servlet-class> com.google.code.kaptcha.servlet.KaptchaServlet </servlet-class> <init-param> <description>圖片邊框,合法值:yes , no</description> <param-name>kaptcha.border</param-name> <param-value>yes</param-value> </init-param> <init-param> <description> 邊框顏色,合法值: r,g,b (and optional alpha) 或者 white,black,blue. </description> <param-name>kaptcha.border.color</param-name> <param-value>black</param-value> </init-param> <init-param> <description>邊框厚度,合法值:></description> <param-name>kaptcha.border.thickness</param-name> <param-value></param-value> </init-param> <init-param> <description>圖片寬 </description> <param-name>kaptcha.image.width</param-name> <param-value></param-value> </init-param> <init-param> <description>圖片高 </description> <param-name>kaptcha.image.height</param-name> <param-value></param-value> </init-param> <init-param> <description>圖片實現類</description> <param-name>kaptcha.producer.impl</param-name> <param-value> com.google.code.kaptcha.impl.DefaultKaptcha </param-value> </init-param> <init-param> <description>文本實現類</description> <param-name>kaptcha.textproducer.impl</param-name> <param-value> com.google.code.kaptcha.text.impl.DefaultTextCreator </param-value> </init-param> <init-param> <description>文本集合,驗證碼值從此集合中獲取</description> <param-name>kaptcha.textproducer.char.string</param-name> <param-value></param-value> <!--<param-value>abcdegfynmnpwx</param-value>--> <!--<param-value>慕課網教程驗證碼實例</param-value> --> </init-param> <init-param> <description>驗證碼長度 </description> <param-name>kaptcha.textproducer.char.length</param-name> <param-value></param-value> </init-param> <init-param> <description>字體 Arial, Courier</description> <param-name>kaptcha.textproducer.font.names</param-name> <param-value>Arial, Courier</param-value> </init-param> <init-param> <description>字體大小 px.</description> <param-name>kaptcha.textproducer.font.size</param-name> <param-value></param-value> </init-param> <init-param> <description> 字體顏色,合法值: r,g,b 或者 white,black,blue. </description> <param-name>kaptcha.textproducer.font.color</param-name> <param-value>black</param-value> </init-param> <init-param> <description>文字間隔 </description> <param-name>kaptcha.textproducer.char.space</param-name> <param-value></param-value> </init-param> <init-param> <description>干擾實現類</description> <param-name>kaptcha.noise.impl</param-name> <param-value> <!-- com.google.code.kaptcha.impl.NoNoise --> com.google.code.kaptcha.impl.DefaultNoise </param-value> </init-param> <init-param> <description> 干擾顏色,合法值: r,g,b 或者 white,black,blue. </description> <param-name>kaptcha.noise.color</param-name> <param-value>black</param-value> </init-param> <init-param> <description> 圖片樣式: 水紋com.google.code.kaptcha.impl.WaterRipple 魚眼com.google.code.kaptcha.impl.FishEyeGimpy 陰影com.google.code.kaptcha.impl.ShadowGimpy </description> <param-name>kaptcha.obscurificator.impl</param-name> <param-value> com.google.code.kaptcha.impl.WaterRipple </param-value> </init-param> <init-param> <description>背景實現類</description> <param-name>kaptcha.background.impl</param-name> <param-value> com.google.code.kaptcha.impl.DefaultBackground </param-value> </init-param> <init-param> <description>背景顏色漸變,開始顏色</description> <param-name>kaptcha.background.clear.from</param-name> <param-value>green</param-value> </init-param> <init-param> <description>背景顏色漸變,結束顏色</description> <param-name>kaptcha.background.clear.to</param-name> <param-value>white</param-value> </init-param> <init-param> <description>文字渲染器</description> <param-name>kaptcha.word.impl</param-name> <param-value> com.google.code.kaptcha.text.impl.DefaultWordRenderer </param-value> </init-param> <init-param> <description> session中存放驗證碼的key鍵 </description> <param-name>kaptcha.session.key</param-name> <param-value>KAPTCHA_SESSION_KEY</param-value> </init-param> <init-param> <description> The date the kaptcha is generated is put into the HttpSession. This is the key value for that item in the session. </description> <param-name>kaptcha.session.date</param-name> <param-value>KAPTCHA_SESSION_DATE</param-value> </init-param> </servlet> <servlet-mapping> <servlet-name>Kaptcha</servlet-name> <url-pattern>/randomcode.jpg</url-pattern> </servlet-mapping>
前臺調用:驗證碼圖片的路徑用了映射名randomcode.jpg,點擊事件onclick()調用了js函數,js函數中同樣的用當前時間使瀏覽器緩存失效來刷新驗證碼圖片。
<html> <head> <meta http-equiv="Content-Type" content="text/html; charset=UTF-"> <title>randomcode</title> <script type="text/javascript"> function changeR(node){ // 用于點擊時產生不同的驗證碼 node.src = "randomcode.jpg?time="+new Date().getTime() ; } </script> </head> <body> <img alt="random" src="randomcode.jpg" onclick="changeR(this)" style="cursor: pointer;"> <form action="check.jsp"> <input type="text" name="r"> <input type="submit" value="s"> </form> </body> </html>驗證碼的比對check.jsp:通過(String) session.getAttribute(com.google.code.kaptcha.Constants.KAPTCHA_SESSION_KEY);得到驗證碼圖片中字符串信息。
<html> <head> <meta http-equiv="Content-Type" content="text/html; charset=UTF-"> <title>check</title> </head> <body> <% // 檢查是否是正確的驗證碼 String k = (String) session .getAttribute(com.google.code.kaptcha.Constants.KAPTCHA_SESSION_KEY); String str = request.getParameter("r"); if (k.equals(str)) out.print("true"); out.print(k + "---" + str); %> </body> </html>實現圖例:


可以發現我們的驗證碼變得越來越來豐富多彩了,但是還停留在一個只驗證英文字母和數字的階段,那么還能不能玩點高端的呢,答案是肯定的。接下來我們來看一下中文驗證碼和算術運算驗證碼怎么實現。都只需基于以上kaptcha的使用進行修改即可。
中文驗證碼的實現:

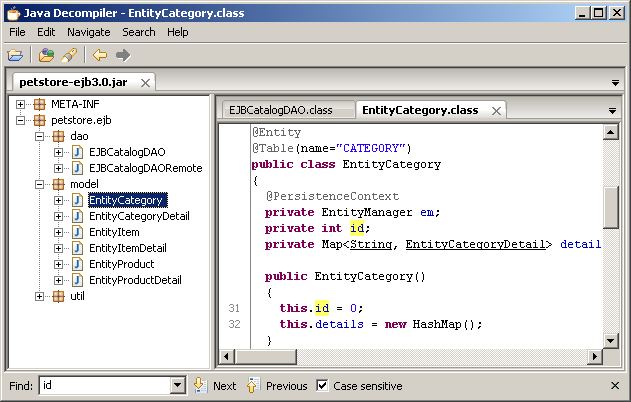
首先我們找到kaptcha.jar包下有個DefaultTextCreator.class字節碼文件,顧名思義,他是來產生驗證碼中文本的一個類,我們可以通過自己實現一個繼承于他的類,并通過配置來使用自己的實現類來使驗證碼中的文本變為中文。經過如下反編譯后得到的類我們可以看到其是那樣實現的,其中的getText()函數用于產生getConfig()配置器將要渲染的驗證碼文本,所以我們只需繼承配置類并實現文本產生接口后重寫getText()方法即可。
public class DefaultTextCreator extends Configurable implements TextProducer { public String getText() { int length = getConfig().getTextProducerCharLength(); char[] chars = getConfig().getTextProducerCharString(); int randomContext = chars.length - ; Random rand = new Random(); StringBuffer text = new StringBuffer(); for (int i = ; i < length; i++) { text.append(chars[(rand.nextInt(randomContext) + )]); } return text.toString(); } }如下為ChineseText.java的具體實現:其中程序只執行getText()中的代碼,原來代碼寫到了getText1()中,不執行,大家可以做一個比較。
public class ChineseText extends Configurable implements TextProducer { public String getText() { int length = getConfig().getTextProducerCharLength(); //char[] charS = getConfig().getTextProducerCharString(); String[] s = new String[]{"我","愛","扎","瓦","和","賣","塞","扣"}; Random rand = new Random(); StringBuffer sb = new StringBuffer(); for(int i = ; i < length; i++){ int ind = rand.nextInt(s.length); sb.append(s[ind]); } return sb.toString(); } /** * 中午實例 * @return */ public String getText() { int length = getConfig().getTextProducerCharLength(); String finalWord = "", firstWord = ""; int tempInt = ; String[] array = { "", "", "", "", "", "", "", "", "", "", "a", "b", "c", "d", "e", "f" }; Random rand = new Random(); for (int i = ; i < length; i++) { switch (rand.nextInt(array.length)) { case : tempInt = rand.nextInt() + ; firstWord = String.valueOf((char) tempInt); break; case : int r, r, r, r; String strH, strL;// high&low r = rand.nextInt() + ; // 前閉后開[,) if (r == ) { r = rand.nextInt(); } else { r = rand.nextInt(); } r = rand.nextInt() + ; if (r == ) { r = rand.nextInt() + ; } else if (r == ) { r = rand.nextInt(); } else { r = rand.nextInt(); } strH = array[r] + array[r]; strL = array[r] + array[r]; byte[] bytes = new byte[]; bytes[] = (byte) (Integer.parseInt(strH, )); bytes[] = (byte) (Integer.parseInt(strL, )); firstWord = new String(bytes); break; default: tempInt = rand.nextInt() + ; firstWord = String.valueOf((char) tempInt); break; } finalWord += firstWord; } return finalWord; } }最后一步就是去web.xml中改文本實現類的值,使組件調用自己寫的那個類產生中文驗證碼。
<init-param> <description>文本實現類</description> <param-name>kaptcha.textproducer.impl</param-name> <param-value> ChineseText </param-value> </init-param>
實現圖例:


算數運算驗證碼的實現:
和上述中文驗證碼相同,我們需要通過繼承類和接口來實現自己的類,并改寫其中的函數,然后通過改配置信息來使組件調用自己實現的類從而實現驗證碼形式的多樣化。

KaptchaServlet字節碼文件經過反編譯后的代碼如下:
public class KaptchaServlet extends HttpServlet implements Servlet { private Properties props = new Properties(); private Producer kaptchaProducer = null; private String sessionKeyValue = null; public void init(ServletConfig conf) throws ServletException { super.init(conf); ImageIO.setUseCache(false); Enumeration<?> initParams = conf.getInitParameterNames(); while (initParams.hasMoreElements()) { String key = (String)initParams.nextElement(); String value = conf.getInitParameter(key); this.props.put(key, value); } Config config = new Config(this.props); this.kaptchaProducer = config.getProducerImpl(); this.sessionKeyValue = config.getSessionKey(); } public void doGet(HttpServletRequest req, HttpServletResponse resp) throws ServletException, IOException { resp.setDateHeader("Expires", L); resp.setHeader("Cache-Control", "no-store, no-cache, must-revalidate"); resp.addHeader("Cache-Control", "post-check=, pre-check="); resp.setHeader("Pragma", "no-cache"); resp.setContentType("image/jpeg"); String capText = this.kaptchaProducer.createText(); req.getSession().setAttribute(this.sessionKeyValue, capText); BufferedImage bi = this.kaptchaProducer.createImage(capText); ServletOutputStream out = resp.getOutputStream(); ImageIO.write(bi, "jpg", out); try { out.flush(); } finally { out.close(); } } }然后自己實現的KaptchaServlet.java代碼如下:在原來的字節碼文件上增加了實現加法驗證碼的邏輯,通過比對即可發現。
public class KaptchaServlet extends HttpServlet implements Servlet { private Properties props; private Producer kaptchaProducer; private String sessionKeyValue; public KaptchaServlet() { this.props = new Properties(); this.kaptchaProducer = null; this.sessionKeyValue = null; } public void init(ServletConfig conf) throws ServletException { super.init(conf); ImageIO.setUseCache(false); Enumeration initParams = conf.getInitParameterNames(); while (initParams.hasMoreElements()) { String key = (String) initParams.nextElement(); String value = conf.getInitParameter(key); this.props.put(key, value); } Config config = new Config(this.props); this.kaptchaProducer = config.getProducerImpl(); this.sessionKeyValue = config.getSessionKey(); } public void doGet(HttpServletRequest req, HttpServletResponse resp) throws ServletException, IOException { resp.setDateHeader("Expires", L); resp.setHeader("Cache-Control", "no-store, no-cache, must-revalidate"); resp.addHeader("Cache-Control", "post-check=, pre-check="); resp.setHeader("Pragma", "no-cache"); resp.setContentType("image/jpeg"); String capText = this.kaptchaProducer.createText(); String s = capText.substring(, ); String s = capText.substring(, ); int r = Integer.valueOf(s).intValue() + Integer.valueOf(s).intValue(); req.getSession().setAttribute(this.sessionKeyValue, String.valueOf(r)); BufferedImage bi = this.kaptchaProducer.createImage(s+"+"+s+"=?"); ServletOutputStream out = resp.getOutputStream(); ImageIO.write(bi, "jpg", out); try { out.flush(); } finally { out.close(); } } }我們還需在web.xml開頭進行更改配置使組件來調用自己實現的servlet:
<servlet-name>Kaptcha</servlet-name> <servlet-class> KaptchaServlet </servlet-class>
實現圖例:


總結:
這里只是簡單實現了驗證碼,但要用到商業項目上還是遠遠不夠的,驗證碼想要不被破解還要加上各種加密算法,即使這樣,也可以隨處搜索到某某驗證碼被破解的情況。在網絡上有一個地下數據庫,里面存儲的是我們的個人信息,那些信息都是一條條整理好的,這十分可怕,但這樣一個數據庫是客觀存在的,驗證碼作為保護賬戶密碼的重要一環,已變得越來越不安全,因為個人信息的泄露,別人掌握了你足夠的信息就可以對你實行詐騙,其中驗證碼是重要一環,近日就有一畢業生被騙取驗證碼后,幾個小時內所有財富都被轉走的事件發生。所以請保護好你的驗證碼,不要輕易泄露給他人。
當然我們也不會坐以待斃,目前的驗證碼種類繁多也越來越難以破解,像語音識別、面部識別這些都是耳熟能詳的就不多說了。
這里我們引入一個驗證碼“新”概念:雙因素認證。
雙因素認證是一種采用時間同步技術的系統,采用了基于時間、事件和密鑰三變量而產生的一次性密碼來代替傳統的靜態密碼。每個動態密碼卡都有一個唯一的密鑰,該密鑰同時存放在服務器端,每次認證時動態密碼卡與服務器分別根據同樣的密鑰,同樣的隨機參數(時間、事件)和同樣的算法計算了認證的動態密碼,從而確保密碼的一致性,從而實現了用戶的認證。因每次認證時的隨機參數不同,所以每次產生的動態密碼也不同。由于每次計算時參數的隨機性保證了每次密碼的不可預測性,從而在最基本的密碼認證這一環節保證了系統的安全性。解決因口令欺詐而導致的重大損失,防止惡意入侵者或人為破壞,解決由口令泄密導致的入侵問題。
簡單來說,雙因素身份認證就是通過你所知道再加上你所能擁有的這二個要素組合到一起才能發揮作用的身份認證系統。例如,在ATM上取款的銀行卡就是一個雙因素認證機制的例子,需要知道取款密碼和銀行卡這二個要素結合才能使用。目前主流的雙因素認證系統是基于時間同步型,市場占有率高的有DKEY雙因素認證系統、RSA雙因素認證系統等,由于DKEY增加對短信密碼認證及短信+令牌混合認證支持,相比RSA,DKEY雙因素認證系統更具競爭力。
以上所述是小編給大家介紹的Java驗證碼制作的相關內容,希望對大家有所幫助!
新聞熱點


疑難解答