1.首先什么是JNI呢?
JNI——(Java Native Interface),他是java平臺的特性,不是安卓系統提供的。他定義了一些JNI函數,來讓開發者可以通過調用這些函數來實現java代碼調用C/C++代碼。
2.如何使用JNI呢?
我們先將寫好的C/C++代碼編譯成對應平臺的動態庫(windows是.dll文件,linux是.so文件)。
下面我們來舉個栗子:使用AndroidStudio來實現JNI
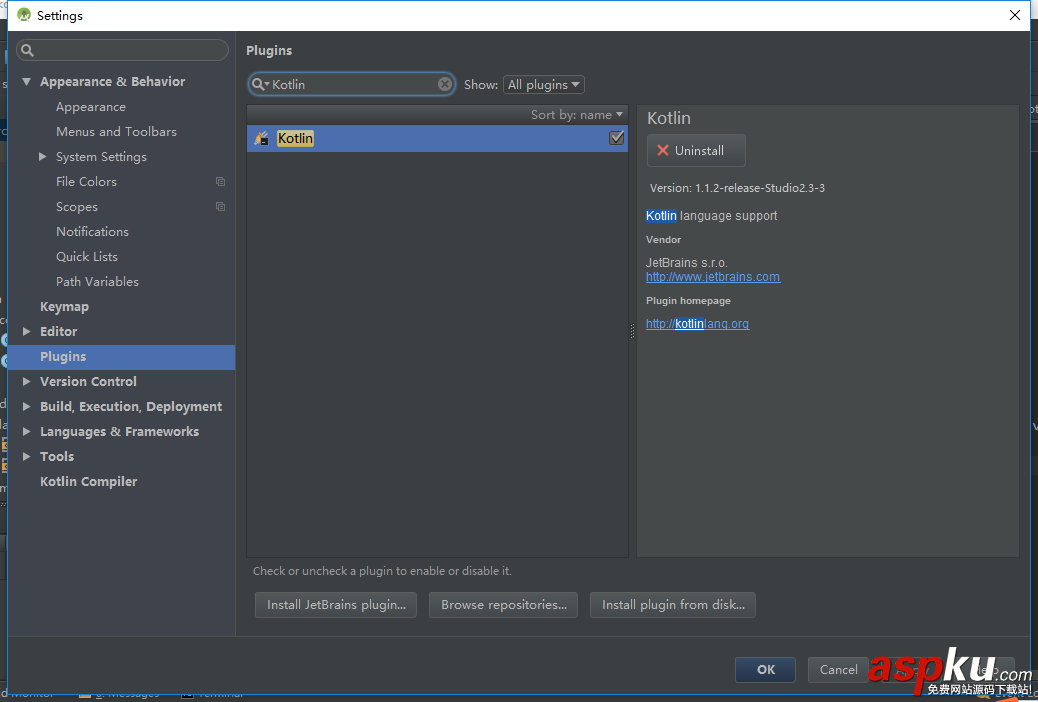
3.要實現JNI先下載NDK,那么NDK又是什么呢?(面試寶典來了,趕緊掏出小本本)

4.下來我們new一個新工程:這個工程只包含一個MainActivity

5.我們來檢查一下NDK下載好了沒有,怎么檢查呢?如下:
檢查SDK Location里面的NDK路徑:

檢查local.properties文件里面有沒有NDK路徑:

6.下來我們要編寫JNI接口啦,如下:
JNI接口需要用native關鍵字修飾,我們會看到方法名報紅,沒關系,我們繼續

7.我們先build一下工程,檢查myJNIUtils.java編譯后有沒有生成class文件,在這個位置下:
AndroidJNITest/app/build/intermediates/classes/debug/com/kissdream/androidjnitest/myJNIUtils.class

8.使用javah生成.h頭文件,具體如下:
打開Terminal,輸入命令進入到debug目錄下,命令如下:
cd/Users/apple/Desktop/AndroidJNITest/app/build/intermediates/classes/debug
然后使用javah+包名+文件路徑來生成頭文件,命令如下:
javah com.kissdream.androidjnitest.myJNIUtils

檢查頭文件有沒有生成:
我們發現這個路徑下多了個.h文件AndroidJNITest/app/build/intermediates/classes/debug/com/kissdream
哈哈,沒錯這個就是我們要生成的頭文件

9.生成了.h文件還不行,只是聲明了方法,我們還需要去實現它,那么如何去實現他呢,如下:
-我們在main下新建一個jni文件夾,如圖:


.h文件內容如下:
/* DO NOT EDIT THIS FILE - it is machine generated */#include <jni.h>/* Header for class com_kissdream_androidjnitest_myJNIUtils */#ifndef _Included_com_kissdream_androidjnitest_myJNIUtils#define _Included_com_kissdream_androidjnitest_myJNIUtils#ifdef __cplusplusextern "C" {#endif/* * Class: com_kissdream_androidjnitest_myJNIUtils * Method: getName * Signature: ()Ljava/lang/String; */JNIEXPORT jstring JNICALL Java_com_kissdream_androidjnitest_myJNIUtils_getName (JNIEnv *, jobject);#ifdef __cplusplus}#endif#endif把生成的.h文件拷貝到jni文件夾下
在jni文件夾下,新建一個.c(c語言)或者.cpp(c++)的文件,來實現.h文件里聲明的方法:
把.h文件里面聲明的方法拷貝到新建的c++文件里面,然后在文件里面引入.h文件:
引入.h文件#include "com_kissdream_androidjnitest_myJNIUtils.h"
#include "com_kissdream_androidjnitest_myJNIUtils.h"JNIEXPORT jstring JNICALL Java_com_kissdream_androidjnitest_myJNIUtils_getName (JNIEnv * env, jobject obj){//如果是用C語言格式就用這種方式// return (*env)->NewStringUTF(env,"Kiss dream"); //如果是用C語言格式就用這種方式return env->NewStringUTF((char *)"Kiss dream");} 
到這里我們的方法就實現完畢了
10.方法我們實現了,但是我們如何調用呢,不要著急,Follow me:
首先引入動態庫:
public class myJNIUtils { static { //名字注意,需要跟你的build.gradle ndk節點下面的名字一樣 System.loadLibrary("NameProvider"); } //JNI接口需要用native關鍵字修飾 public native String getName();}NameProvider就是你要生成d的.so文件的文件名
下面我們來調用它

11.最重要的一步來了,生成so文件:
這個小編也不會,于是就去百度了下,得到結果:
在根目錄gradle.properties下面加上:
android.useDeprecatedNdk=true意思就是允許使用低版本的NDK
在module下面的build.gradle下面加上ndk節點如下圖:
ndk { moduleName "NameProvider" }NameProvider注意這個名字要跟你引入動態庫的名字一樣
需要這倆步就可以運行生成so文件了
然兒,并沒有想象的那么順利,報錯了,我頓時心中飛過一萬只草泥瑪,上log:
Error:Execution failed for task ':app:compileDebugNdk'.> Error: Flag android.useDeprecatedNdk is no longer supported and will be removed in the next version of Android Studio. Please switch to a supported build system. Consider using CMake or ndk-build integration. For more information, go to: https://d.android.com/r/studio-ui/add-native-code.html#ndkCompile To get started, you can use the sample ndk-build script the Android plugin generated for you at: /Users/apple/Desktop/AndroidJNITest/app/build/intermediates/ndk/debug/Android.mk Alternatively, you can use the experimental plugin: https://developer.android.com/r/tools/experimental-plugin.html To continue using the deprecated NDK compile for another 60 days, set android.deprecatedNdkCompileLease=1512283120054 in gradle.properties
百思不得其姐啊,百度的答案大家都是這樣做啊,為什么人家可以我的就不行呢,我的代碼和他的一模一樣啊
為什么人家可以我的就不行呢,我的代碼和他的一模一樣啊這句話作為程序員的我們很熟悉!難到我要放棄嗎?no no no,作為程序員的我怎么能輕言放棄呢!每個人都有這樣的經歷,藍瘦過、香菇過,到最后我們都找到我們的錯誤
來我們仔細看下Log,大概意思就是說:
考慮使用CMake或ndk構建集成。要了解更多信息,請訪問:
https://d.android.com/r/studio-ui/add-native-code.html#ndkCompile
首先,您可以使用Android的ndk構建腳本示例插件為您生成:
/Users/apple/Desktop/AndroidJNITest/app/build/intermediates/ndk/debug/Android.mk
或者,你可以使用實驗插件:
https://developer.android.com/r/tools/experimental-plugin.html
繼續使用已棄用的NDK編譯60天,設置
在gradle.properties
android.deprecatedNdkCompileLease = 1512283120054(這個測試不起作用)
經過各種查資料,發現原來在gradle3.0以上以前這種方法不在支持
學習過程就不詳細描述了,直接上結果:
先通過SDKManager下載:CMake和LLDB

在build.gradle的defaultConfig節點下加入:
// 使用Cmake工具 externalNativeBuild { cmake { cppFlags "" //生成多個版本的so文件 abiFilters 'arm64-v8a','armeabi-v7a','x86','x86_64' } }在build.gradle的android節點下加入:
// 配置CMakeLists.txt路徑 externalNativeBuild { cmake { path "CMakeLists.txt" // 設置所要編寫的c源碼位置,以及編譯后so文件的名字 } } 
添加CMakeLists.txt文件到build.gradle文件同級目錄下,具體內容如下:
# For more information about using CMake with Android Studio, read the# documentation: https://d.android.com/studio/projects/add-native-code.html# Sets the minimum version of CMake required to build the native library.#CMakeLists.txtcmake_minimum_required(VERSION 3.4.1)# Creates and names a library, sets it as either STATIC# or SHARED, and provides the relative paths to its source code.# You can define multiple libraries, and CMake builds them for you.# Gradle automatically packages shared libraries with your APK.add_library( # Sets the name of the library. # 設置so文件名稱. NameProvider # Sets the library as a shared library. SHARED # 設置這個so文件為共享. # Provides a relative path to your source file(s). # 設置這個so文件為共享. src/main/jni/getName.cpp)# Searches for a specified prebuilt library and stores the path as a# variable. Because CMake includes system libraries in the search path by# default, you only need to specify the name of the public NDK library# you want to add. CMake verifies that the library exists before# completing its build.find_library( # Sets the name of the path variable. log-lib # Specifies the name of the NDK library that # you want CMake to locate. log )# Specifies libraries CMake should link to your target library. You# can link multiple libraries, such as libraries you define in this# build script, prebuilt third-party libraries, or system libraries.target_link_libraries( # Specifies the target library. # 制定目標庫. NameProvider # Links the target library to the log library # included in the NDK. ${log-lib} ) 
至此,我們所有的流程都做完了,下面來檢查一下我們的成果,見證奇跡的時候到了:

可以看到我們已經成功生成so文件,再來上個效果圖:

下載地址:點擊下載Demo
以上就是本文的全部內容,希望對大家的學習有所幫助,也希望大家多多支持VEVB武林網。
新聞熱點


疑難解答